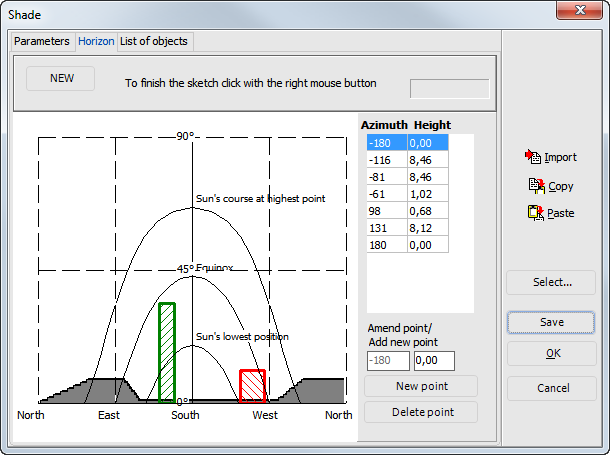
Variant menu:
 System Definition > Shading > Horizon
Definition of shading via horizon and individual objects
The resulting shade reduces the irradiation to the collector surface area.
In order to edit the horizon or objects relevant to the shading of your collectors, you must have noted the prominent points of the horizon line from your solar system. This can be done with a compass and protractor, a sun path indicator, or a digital camera and editing software.
A horizon point consists of the azimuth, i.e., the angle measured from the horizontal, and the respective height angle, also measured in angle degrees.
For definition of the azimuth, refer to: Installation
- Start by clicking on the horizon line with the left mouse button. The current position of the cursor can be seen in the upper bar, given as “azimuth : height”. A dashed line is drawn between the starting point and the current position.
- Click the next point using the left mouse button, thus confirming the dashed line. The horizon line can only go from left to right. As a result, no dashed line can be seen if you move the cursor left of the (current) end point.
- Stop drawing by clicking the right mouse button.
- Redrawing lines can only be done after completing the current sketch point and from an already defined point. The following text is displayed in the upper bar: “To amend the horizon, click with the left mouse button exactly on the horizon line.” It can be difficult to click on the existing horizon line where this is vertical. Rather enter a fitting individual object. This is done on the List of Objects page. The Shading from Individual Objects dialog opens.
Or enter the vertices of the horizon in the table directly. The start and end point are already entered, as are any generated with the mouse.
- Define a point via New Point first.
- Add a point to the table using Add new Point. On being entered, the point appears in the sketch.
- You can copy
 the table to the clipboard and from there into spreadsheets such as Excel.
 - You can paste
 a table from the clipboard.
 - You can remove the selected point (blue background) by clicking Delete Point.
Or import
 horizon lines created with the horizON and calculation software by clicking the button.
- You can delete the horizon at any time by clicking the New button.
- Save this horizon and its objects for further use in other variants.
To print out the shade diagram, you must copy the activated dialog to the clipboard with the key combination ALT+PRINT and paste it into a word processing program such as Microsoft Word via the menu Edit > Paste. As an example, you will then see image 10.4.3, can scale and print it out.
