Heat pump > Select > Context menu > Properties
Select Properties via the context menu of the heat pump (right mouse button) to display the data sheet.
-
The heat pump data is displayed under Properties. In the case of self-created, copied heat pumps, the data can also be be edited. The following data is displayed:
- Product properties
- for keymark heat pumpt, the data according to EN 14825
- Performance data
- Scope of Application, Temperature limits
- Volume flows rates and other data, such as refrigerant and power supply
-
With Create copy, the data of the selected heat pump is copied and a new heat pump is created.
-
With Delete, the selected heat pump is deleted if it is a self-created, copied heat pump.
How to enter your own heat pump or edit your own heat pump data:
-
Open the heat pump database with Select.
-
Select a heat pump (left mouse button or simply click).
-
Go to the context menu (right mouse button) Create copy (left mouse button). A copy of this heat pump is opened.
-
Name the new heat pump, change the Manufacturer and the Description as required.
-
Go to the Performance data tab and enter the full load points for the desired heat pump.
-
Under Data input, you can determine how the data should be entered. The following input options are available:
- Heating output and electrical power
- Electrical power and COP
- Heating output and COP
Use Add test point to create additional test points.
-
All test points are listed under Performance data. Three points are assigned to each test point, consisting of source and supply.
- Source in °C - depending on the heat pump, the source is A = Air , B = Brine , W = Water
- Supply in °C
- Test points for defining minimum power, rated power and maximum power
- Selection box for selecting the test point. Several/all test points can be selected (see Actions for selected test points below).
The following conditions must be met when entering the data so that the data can be saved:
- The temperatures of the heat source and heat sink must be within the application limits.
- The electrical power and heating output must be greater than 0.
- The COP must not be greater than the theoretically possible COP (Carnot).
- At least 4 performance points must be specified as full load points.
- Of these 4 points, respectively 2 power points must have the same heat source temperature and different heat sink temperatures. E.g. A7/W35, A7/W55 and A2/W35, A2/W55.
- Please note: The more power points are specified, the more accurate the simulation will be.
-
Under Actions for selected test points, you can edit several test points at the same time. The test points you want to edit can be selected under Performance data or via Select all. You can perform the following actions:
- Utilisation for all maxima - Calculate calculates the maximum power for all selected test points.
- Utilisation for all minima - Calculate calculates the minimum power for all selected test points.
- Delete - all selected test points are deleted.
-
-
Go to the Scope of application tab and enter the temperature limits for the source side and the sink side. The diagram shows the operating limits and test points.
Further information on the application limits can be found below. -
Go to the Volume flows rates and other data tab and enter the volume flow rates. The information on the refrigerant and the power supply are optional.
-
Save the new heat pump with OK. In the event of errors, the dialogue remains open and the corresponding errors are displayed. If no error has been detected, the Properties dialogue is closed and the heat pump database with your own product is displayed.
-
Filter your own heat pumps from the list by clicking on the selection box Show user-created products only. Information on the application limit
How to pass on the data of user-created heat pumps to a colleague:
-
Open the heat pump database with Select.
-
Select the desired heat pump.
-
Press the Export button and save the file.
-
Give the file a colleague.
-
In the heat pump database, the file can be added to your own database via Import.
How to enter the operating temperatures of the heat pump:
-
Enter 4, 5 or 6 temperature pairs. Just leave the other entry fields blank. If you don’t have data from the manufacturer, click on Default values.
-
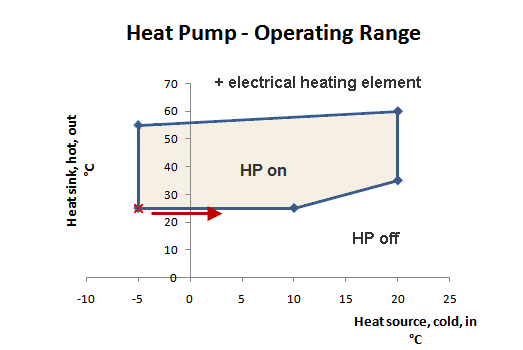
All temperatures must be entered in °C. Start with the coldest heat source temperature / coldest heat sink temperature pair (
 )
) -
Continue counter-clockwise as in the image above.
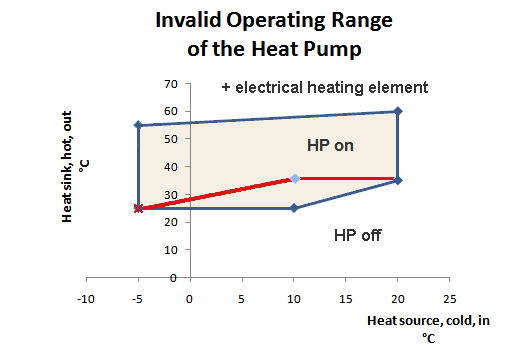
! Please note: the area formed by the temperature pairs may not have a “dent”, it must be concave on all sides. The operating range represented by the inner, red line of the lower image means that this heat pump cannot be calculated.


