Interface to mounting system software
Introduction
Thanks to the newly developed interface to software solutions of mounting system manufacturers, systems planned in PV*SOL® can be transferred to the manufacturer’s software. There, the system is designed according to the available mounting systems and the structural analysis. The finished mounting system planning can then be imported back into PV*SOL®, including the parts list and the report of the structural analysis.
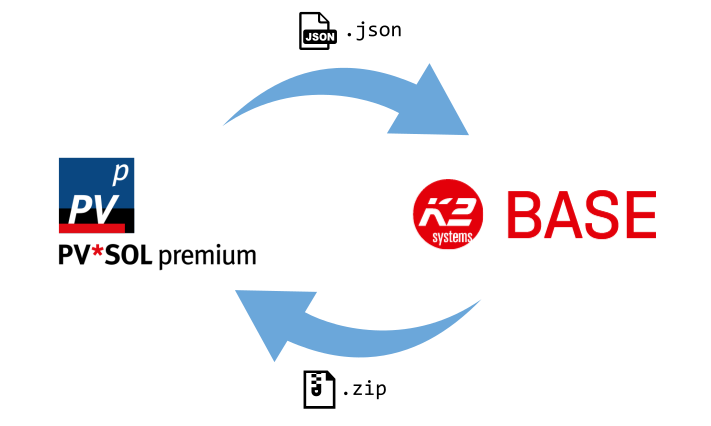
Scheme of the mounting system interface
The exchange between the programs is done with json and zip files:
- A json file is exported from PV*SOL®, which is then imported into K2 Base or the Renusol PV Configurator.
- A zip file is exported from K2 Base or Renusol PV Configurator, which is imported into PV*SOL®
If several module areas should be covered with modules with the mounting system software, steps 1. and 2.must be performed individually for each module area.
Supported mounting system software:
- K2 Base
- Requirement: PV*SOL® premium 2023 R5 or higher
- Renusol PV Configurator
- Requirement: PV*SOL® premium 2025 R6 or higher
Requirements
The precondition for using the interface is PV*SOL® premium 2023 R5 or newer for K2 Base or PV*SOL® premium 2025 R6 or newer for Renusol PV Configurator, as well as an activated account for the planning tool of the mounting system manufacturer.
Workflow
The interface has been designed in a way that the user will get the fastest result with the following workflow.
1. Pre-planning PV*SOL®
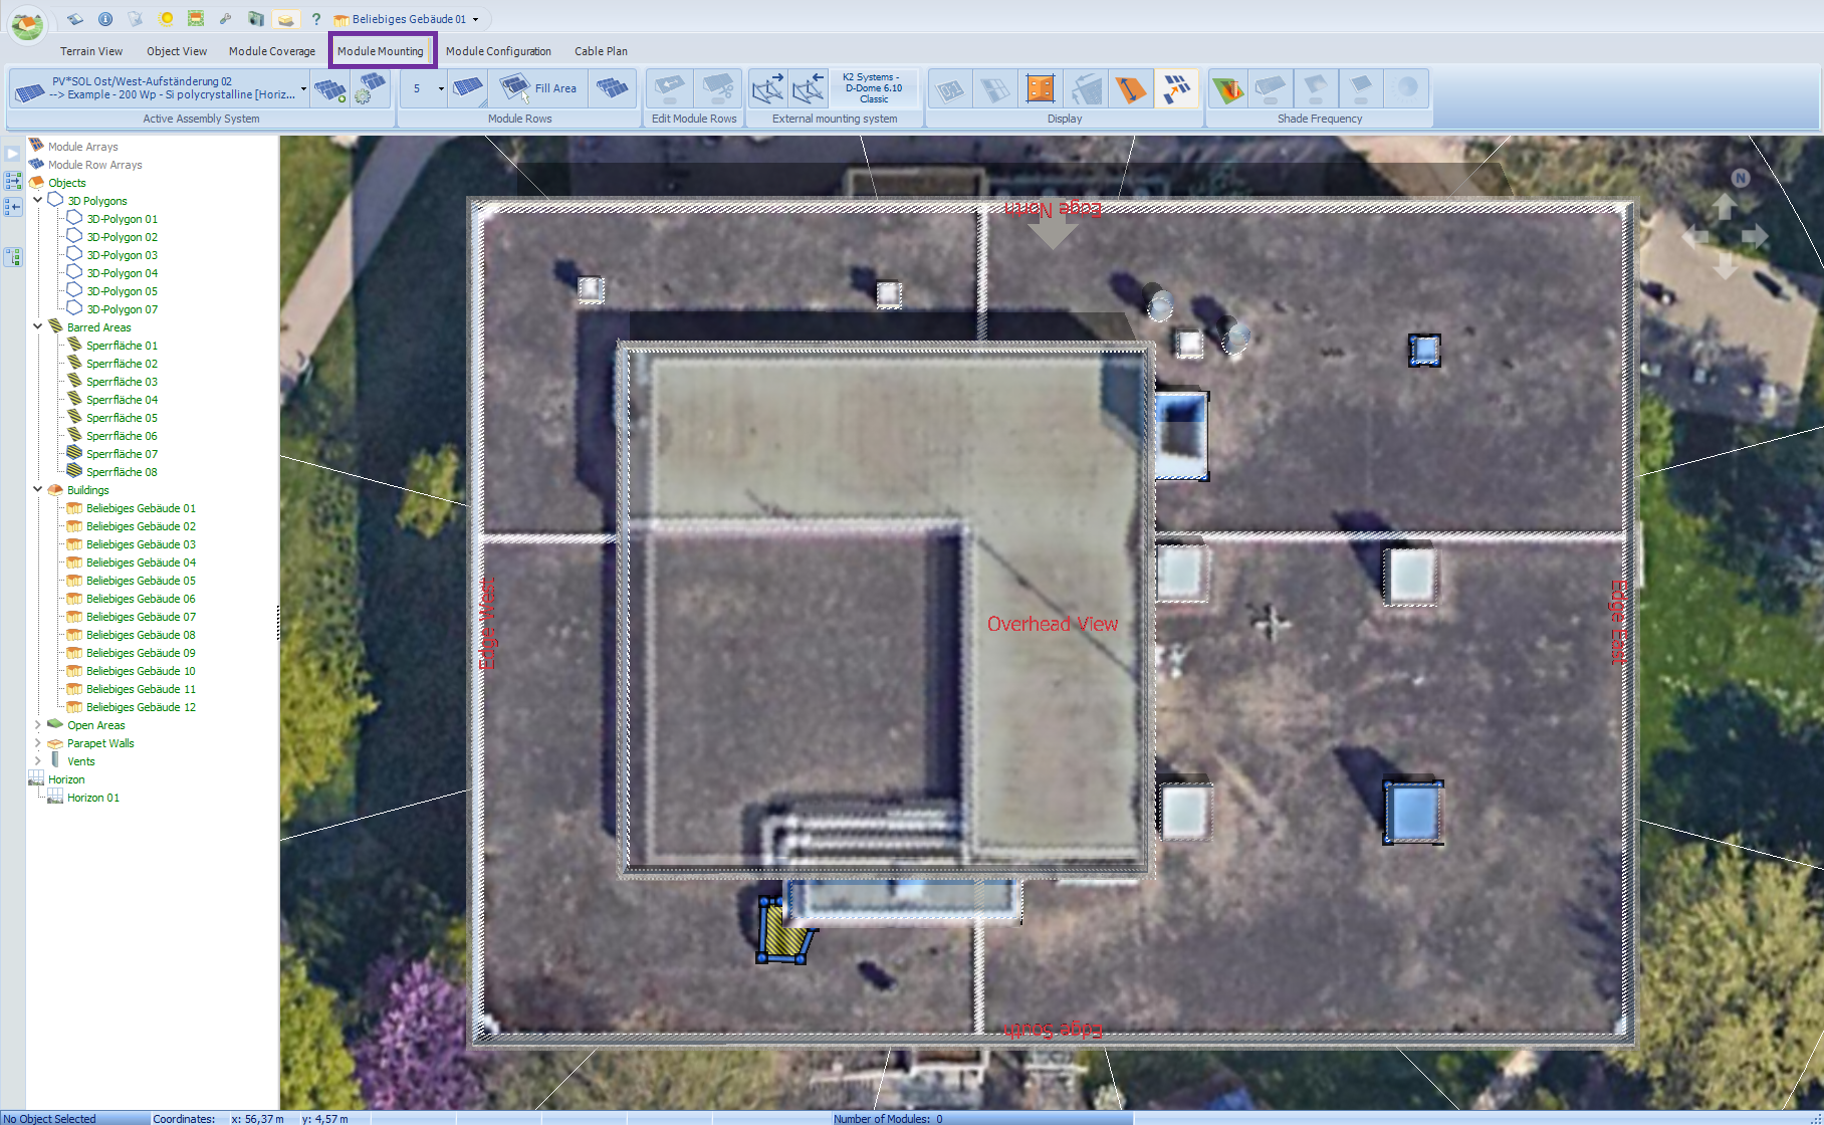
First, the system is planned as usual in PV*SOL®, only without PV modules. It is important that the correct location has already been selected. Barrier objects and shading objects should also already be placed. Barred areas added in the mounting system software are currently not transferred to PV*SOL®. A module must specified but not yet placed on the module area. The modules are placed later in the mounting system program.
2. Export dialogue PV*SOL®
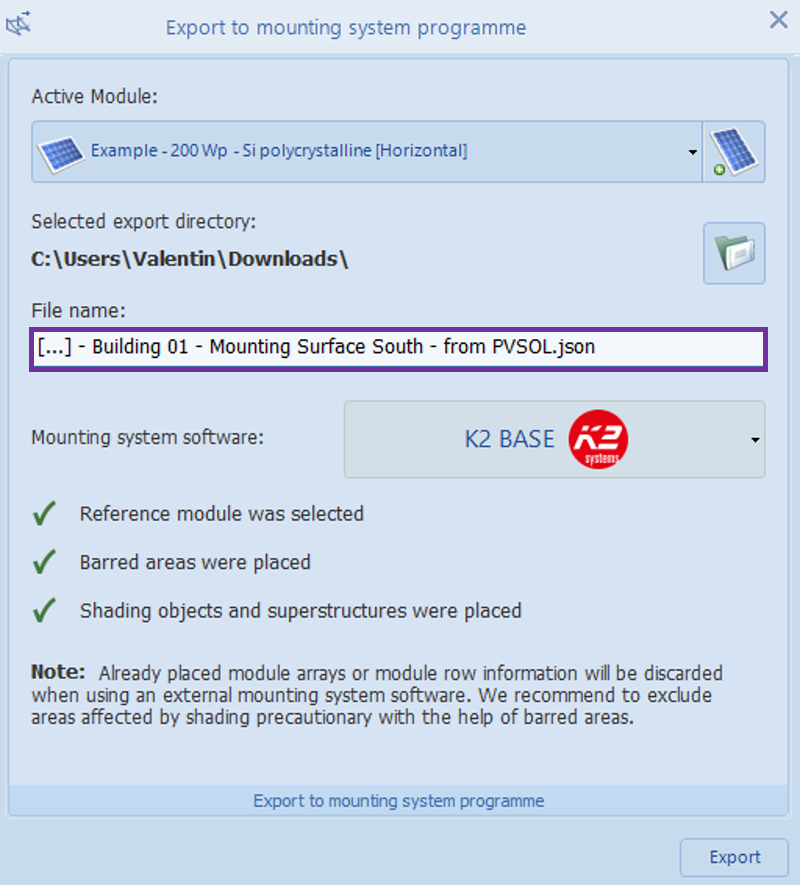
Once these steps have been completed, the export dialogue can be opened via the button Export to mounting system program
 .
.

Buttons to open the export and import dialogues
Regardless of whether you were previously in the module coverage or module mounting tab, the same export dialogue will open in both cases:
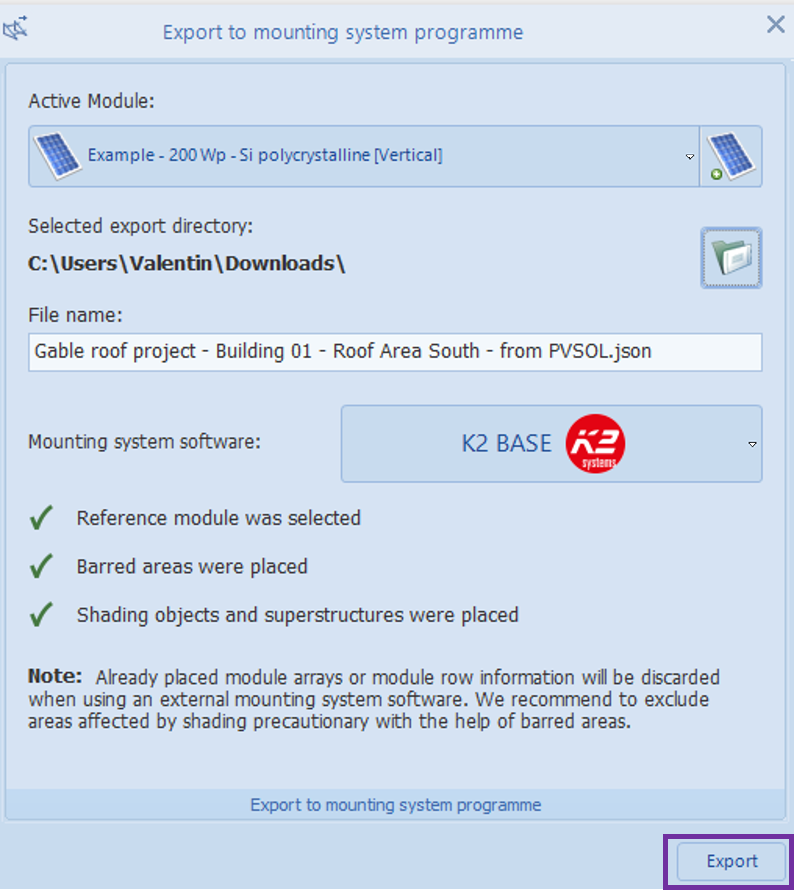
Export-Dialogues
If no module has been specified yet, this can be done here by clicking on New Module
 to the right of the first drop-down list.
The storage directory for the export as well as the import of projects is the download directory.
If desired, it can be changed by clicking on the folder icon.
to the right of the first drop-down list.
The storage directory for the export as well as the import of projects is the download directory.
If desired, it can be changed by clicking on the folder icon.
The file name is composed of the project name, the name of the 3D object (e.g. building), an exclusive designation of the roof and the addition " - from PVSOL". The filename can be changed. However, this is not recommended so that PV*SOL® can automatically select the zip file to import later. In order to easily distinguish between the export and import files, the import file (zip file) has the addition " - from [name of the mounting system manufacturer]". Next, the desired mounting system manufacturer can be selected.
If barred areas and shading objects have been placed and a module has been specified, the corresponding points should all have a green tick and you can continue with the Export button. This is also possible if no barred areas and shading objects have been created.
To make it easier to import the project back to PV*SOL later, do not make any changes to your PV*SOL project from now until after the import.
3. Planning in the mounting system software
To continue with the selection of the mounting system and the coveage you first need access to the mounting system software.
Planning in K2 Base
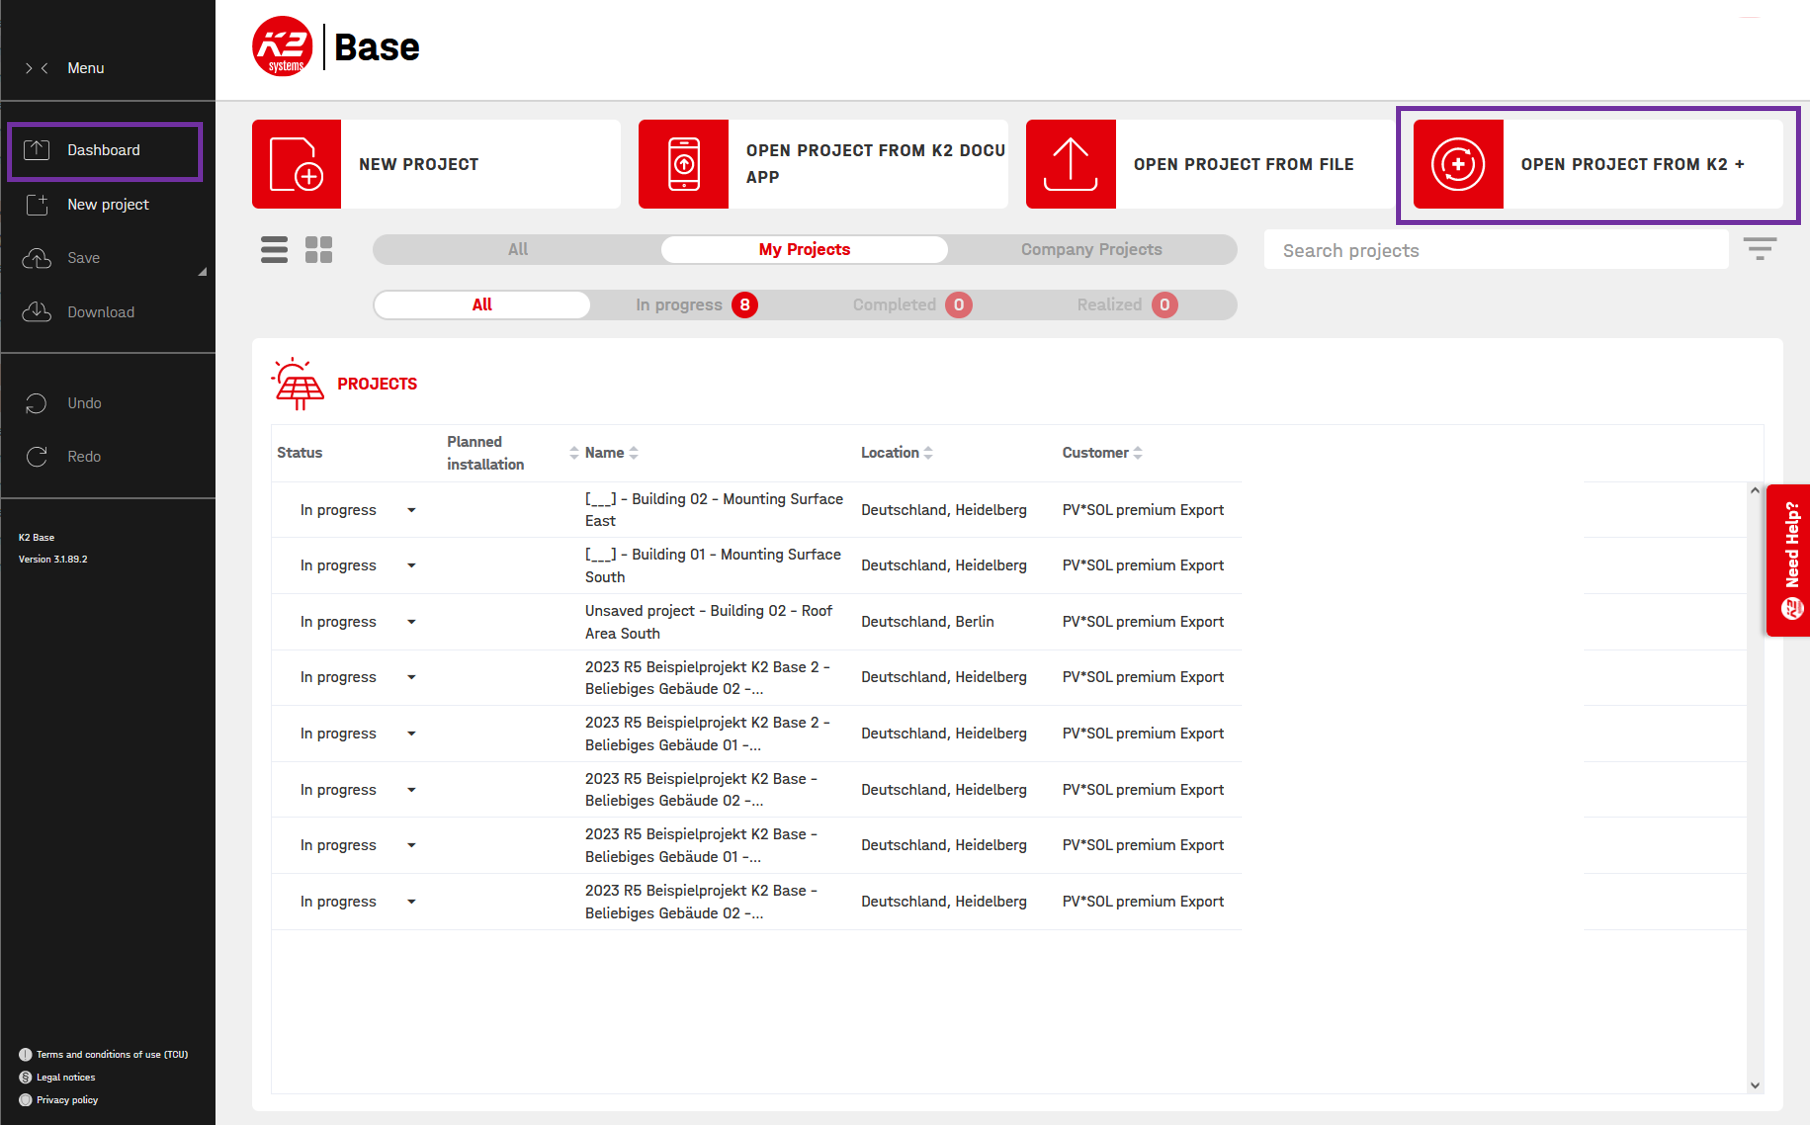
- Log in to K2 Base or create a new account.
K2 Base - Create new import project
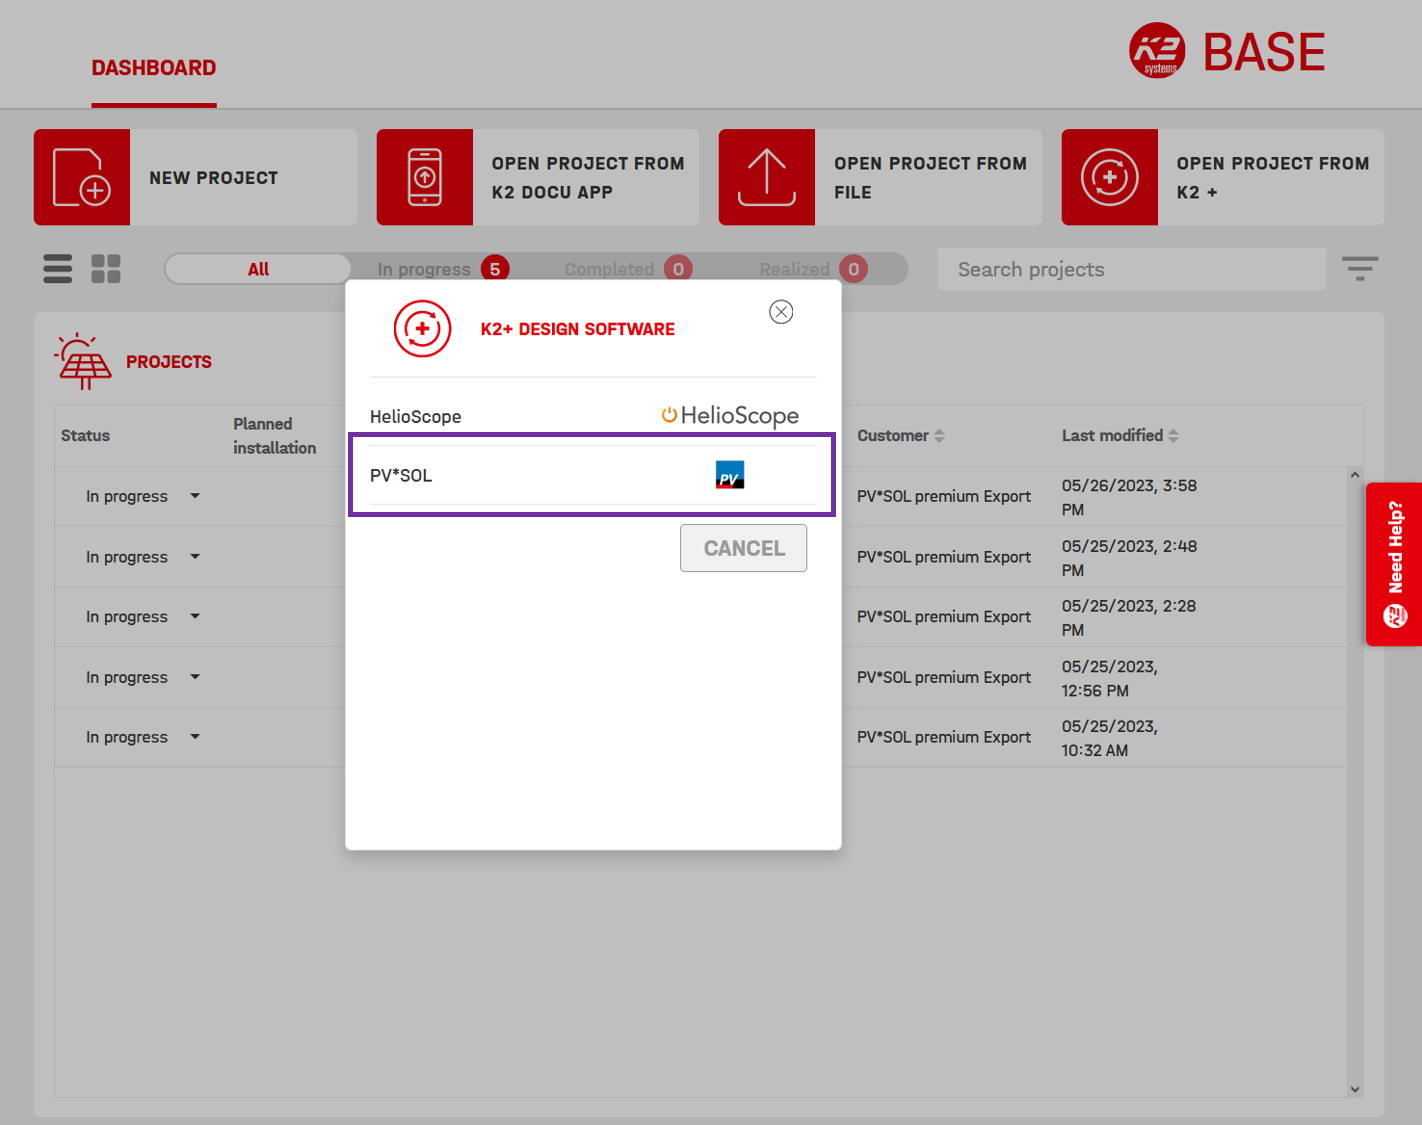
K2 Base - Select PV*SOL
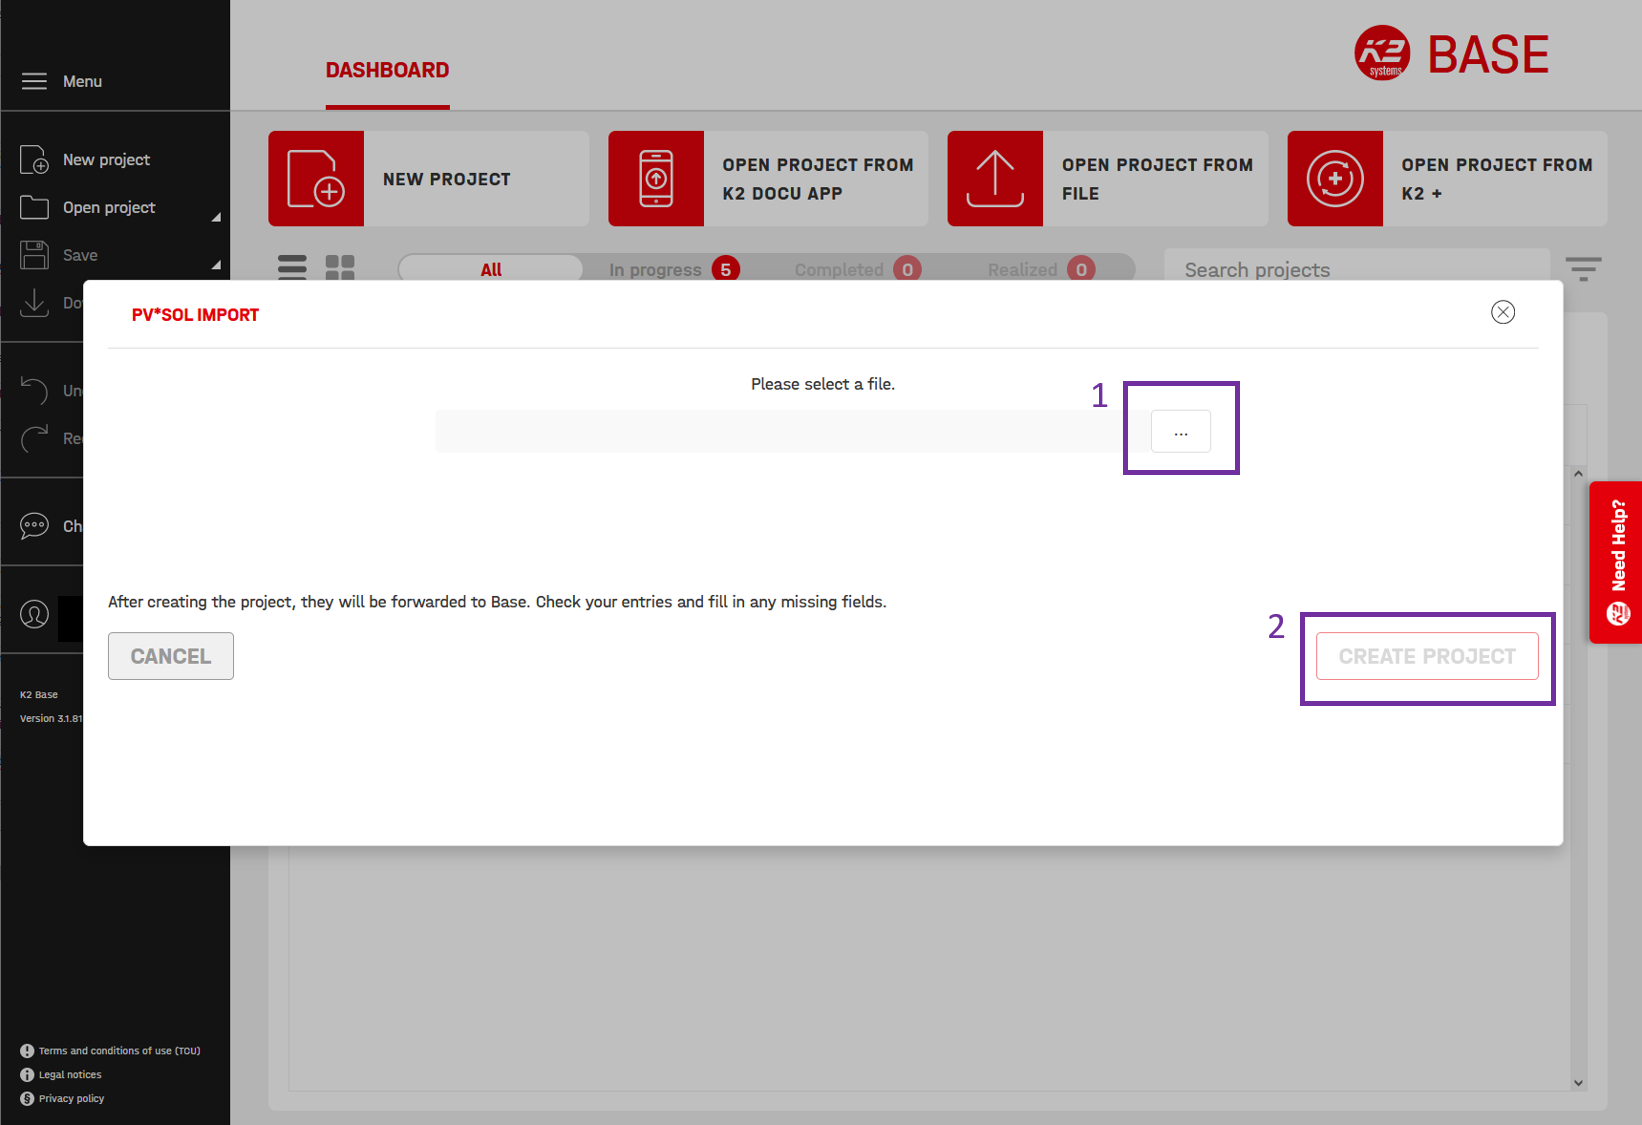
K2 Base - select json file for import
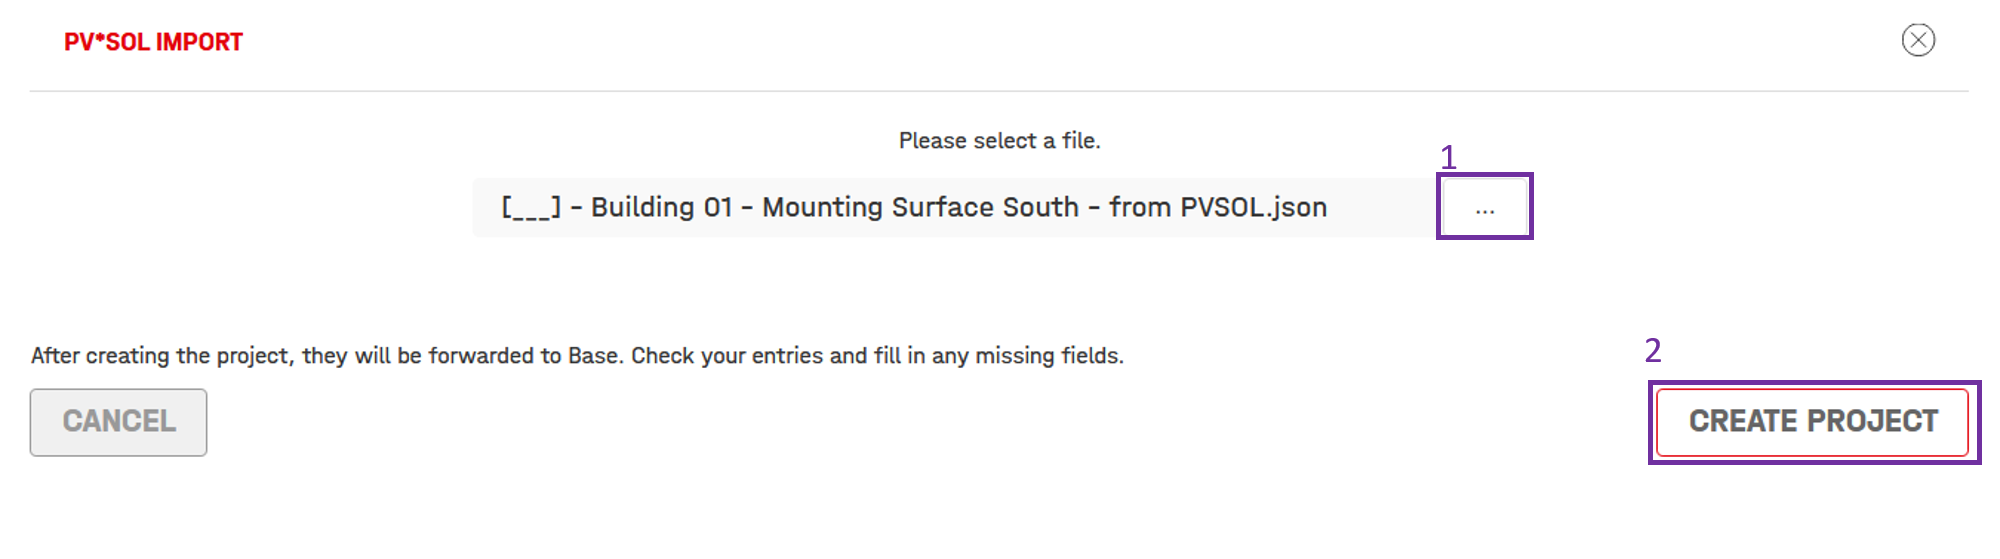
- In the K2 Base Dashboard, click the Open Project from K2+ button in the upper right corner. In the selection dialogue, please select PV*SOL®. In the PV*SOL Import dialogue click on the three dots next to the input field to load the json file exported by PV*SOL® into K2 Base. The path to the json file is on the clipboard and you can paste it directly into the file name field. Alternatively, navigate to the download directory or your chosen storage location, select the file ending in - from PVSOL.json and confirm with open and then create project.
- If a message appears that the import was successful, confirm it with OK. If not, please make sure you have selected the correct - from PVSOL.json file.
K2 Base will now ask you for data on the loads and structural analysis. In the following, only the essential steps of planning are described, which are necessary to obtain a zip file that can be imported back into PV*SOL® afterwards. If you have questions about the K2 Base software, you can find the FAQs provided by K2 on https://k2-systems.com/en/faq-category/k2-base-en/. For further questions about K2 Base, please email base@k2-systems.de.
- To continue planning, first enter a terrain category for the project and click continue.
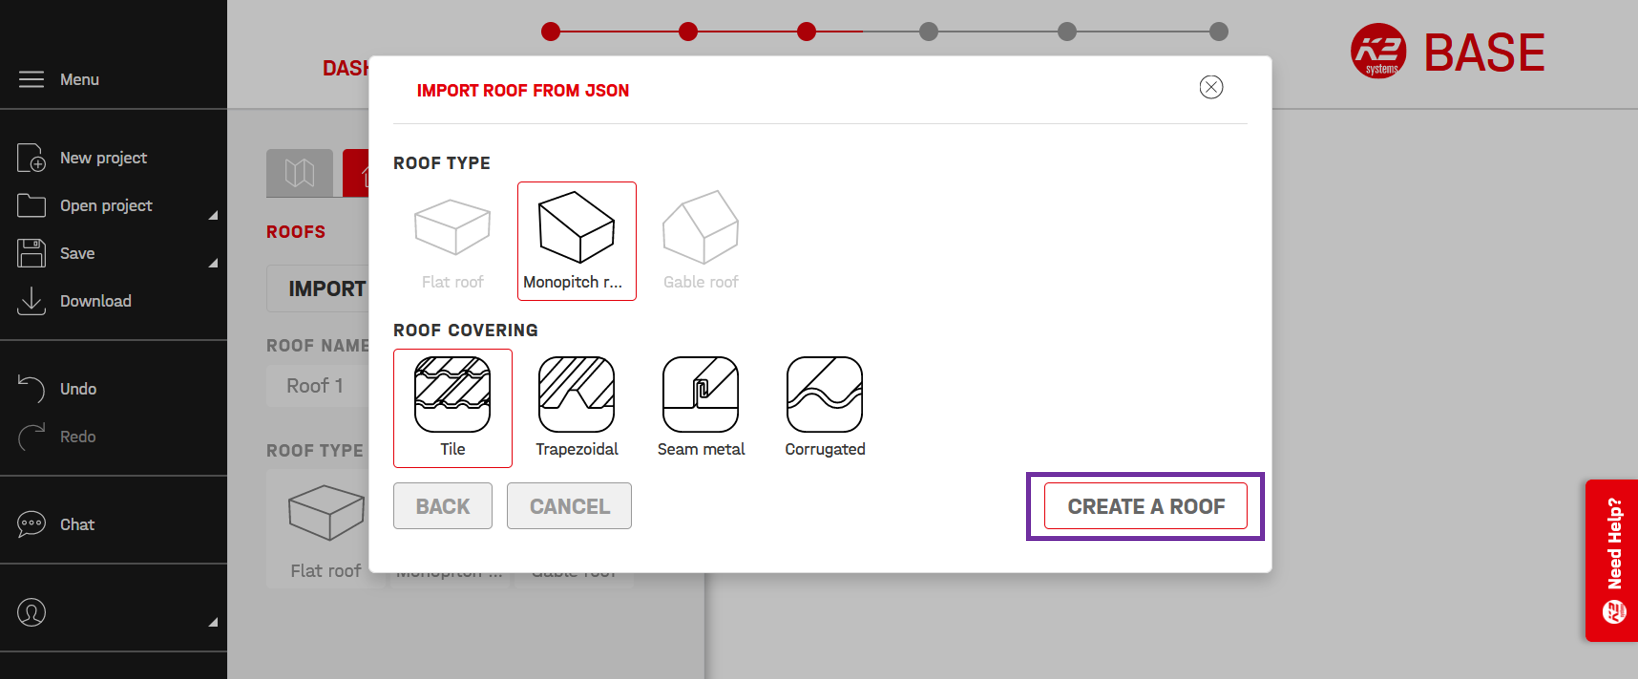
K2 Base - Create a roof
- In the following dialogue please click on Create a roof.
You should now be on the roof tab.
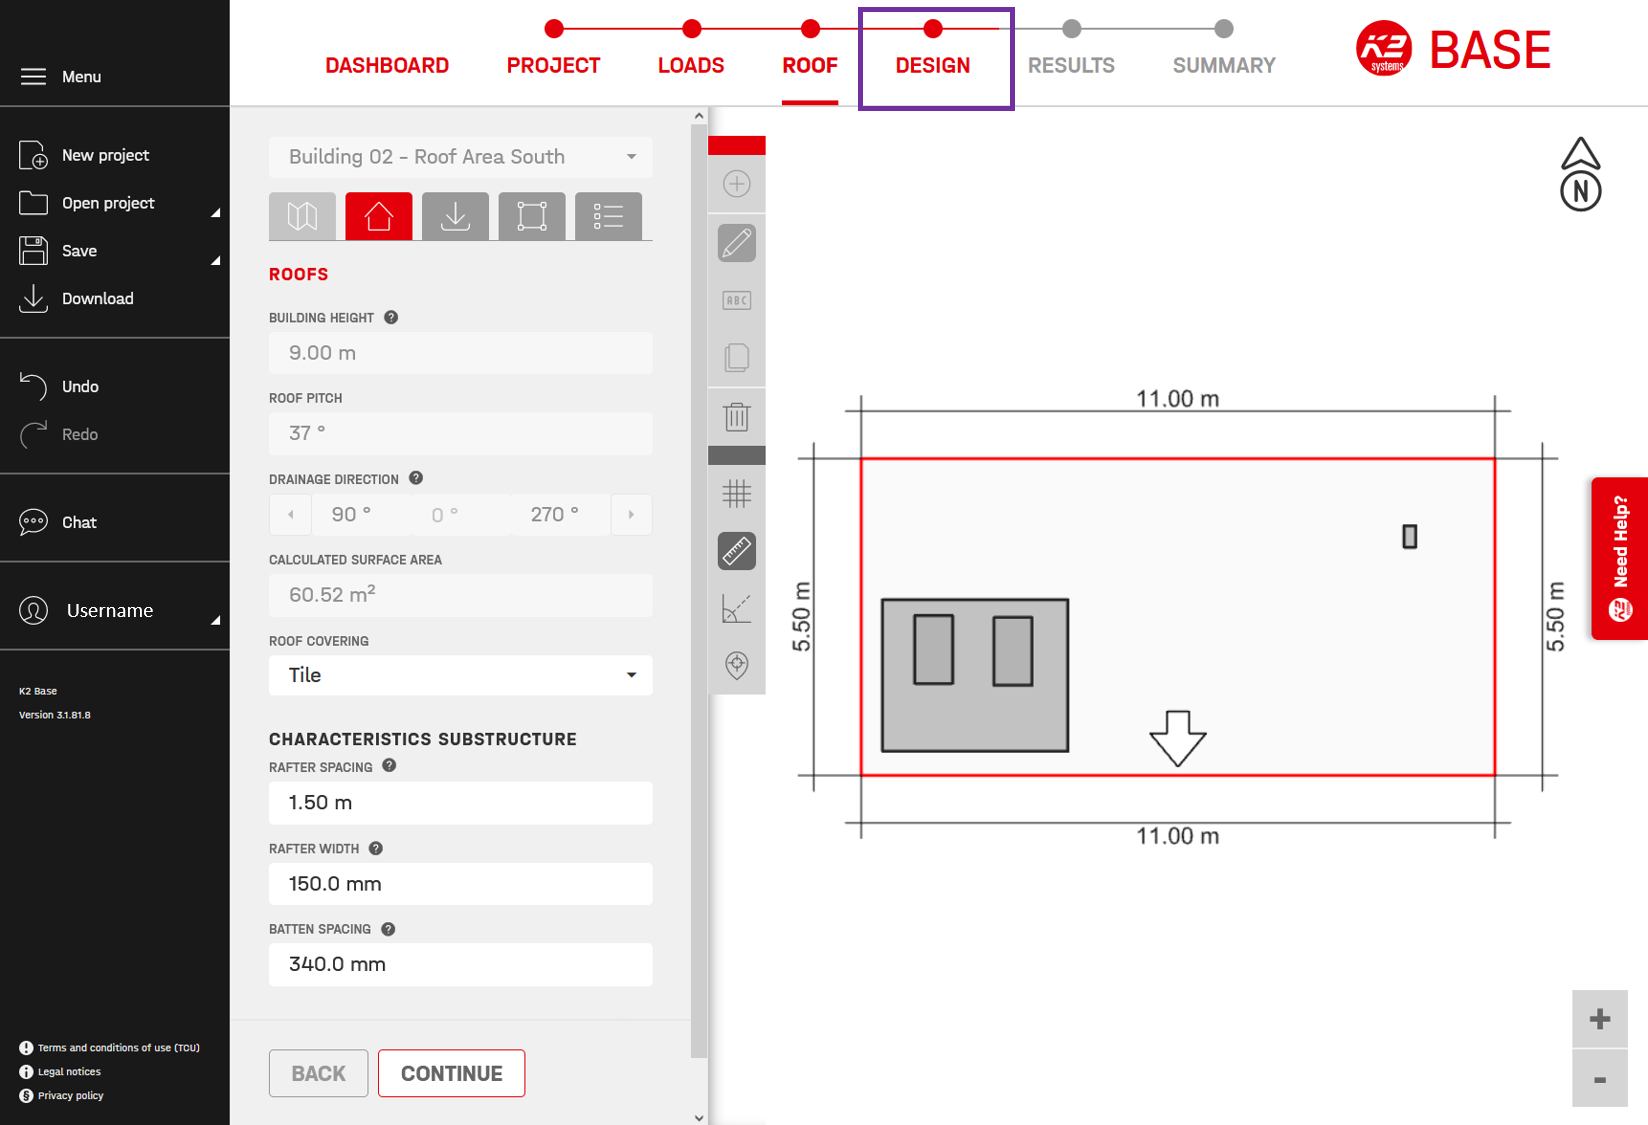
K2 Base - Roof design
- Now click on the next tab labelled Design.
Select the mounting system you want, whether you want to cover part or all of the roof surface, whether the modules should be elevated and the orientation of the modules.
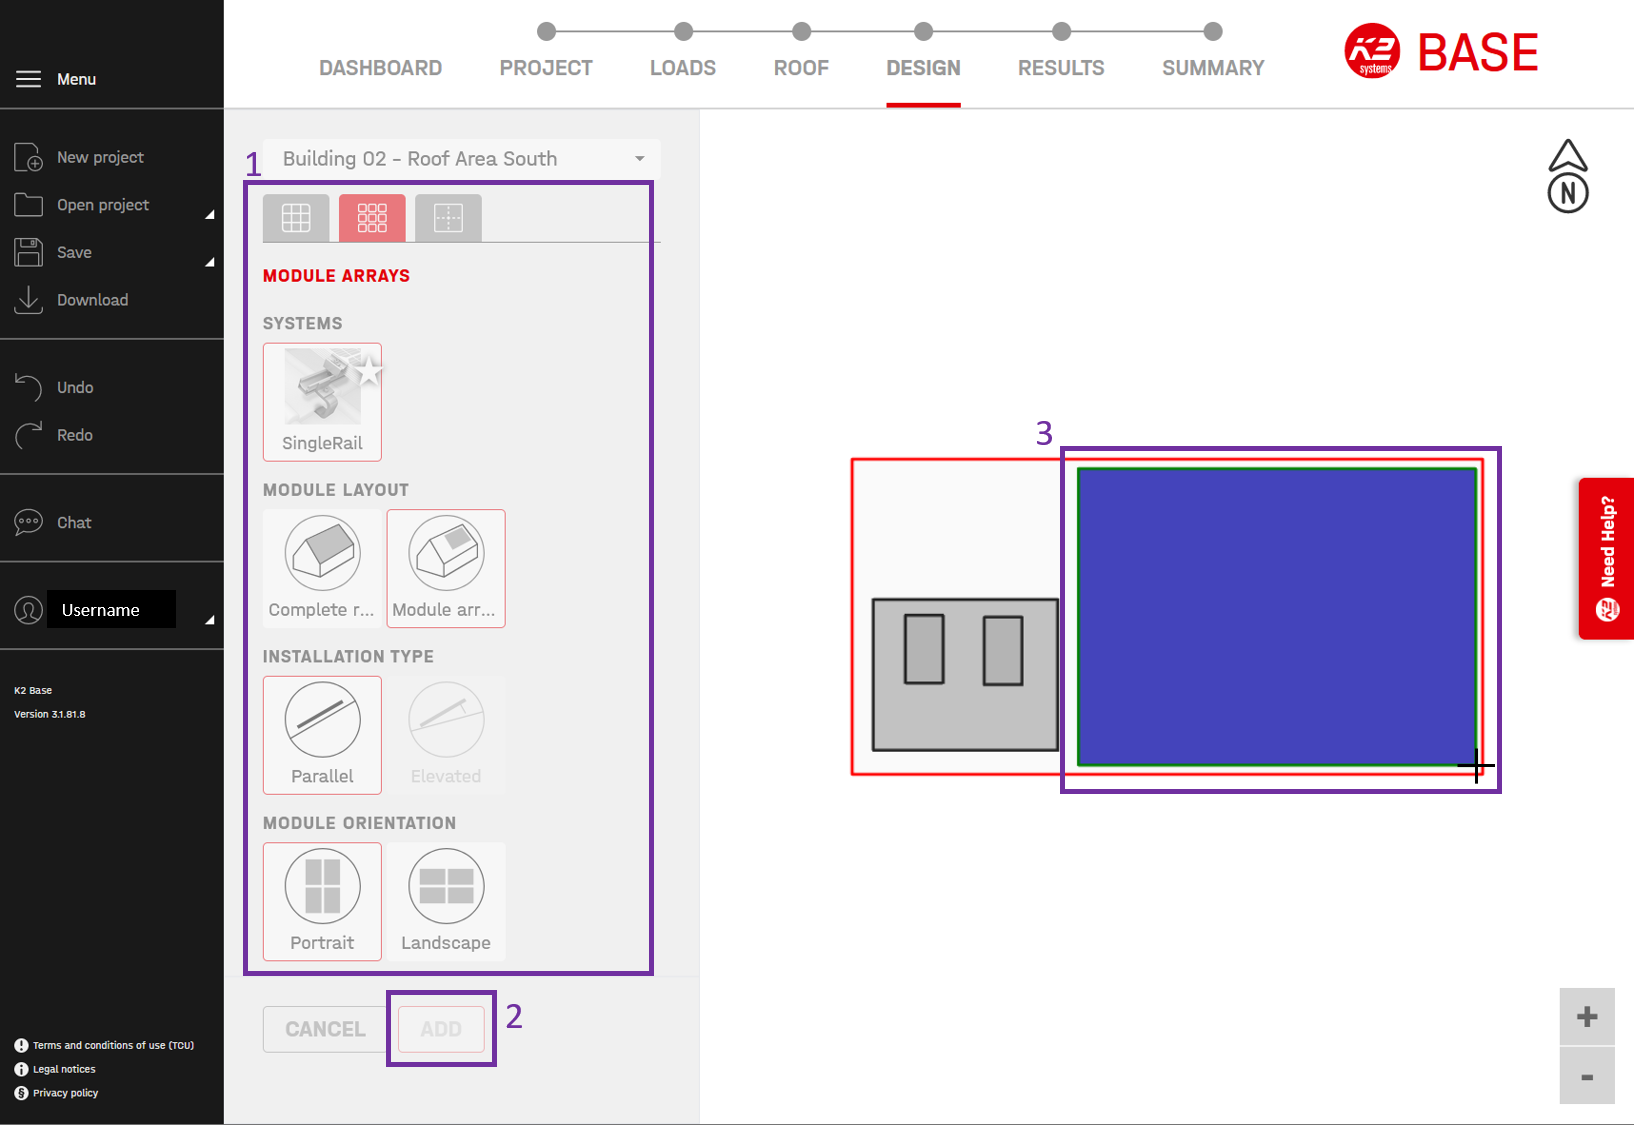
K2 Base - Select mounting system and cover module area
- Now click on add.
If you have selected manual dragging of a module array, move the mouse pointer to the mdule area shown and click once to start dragging and one more time to stop dragging.
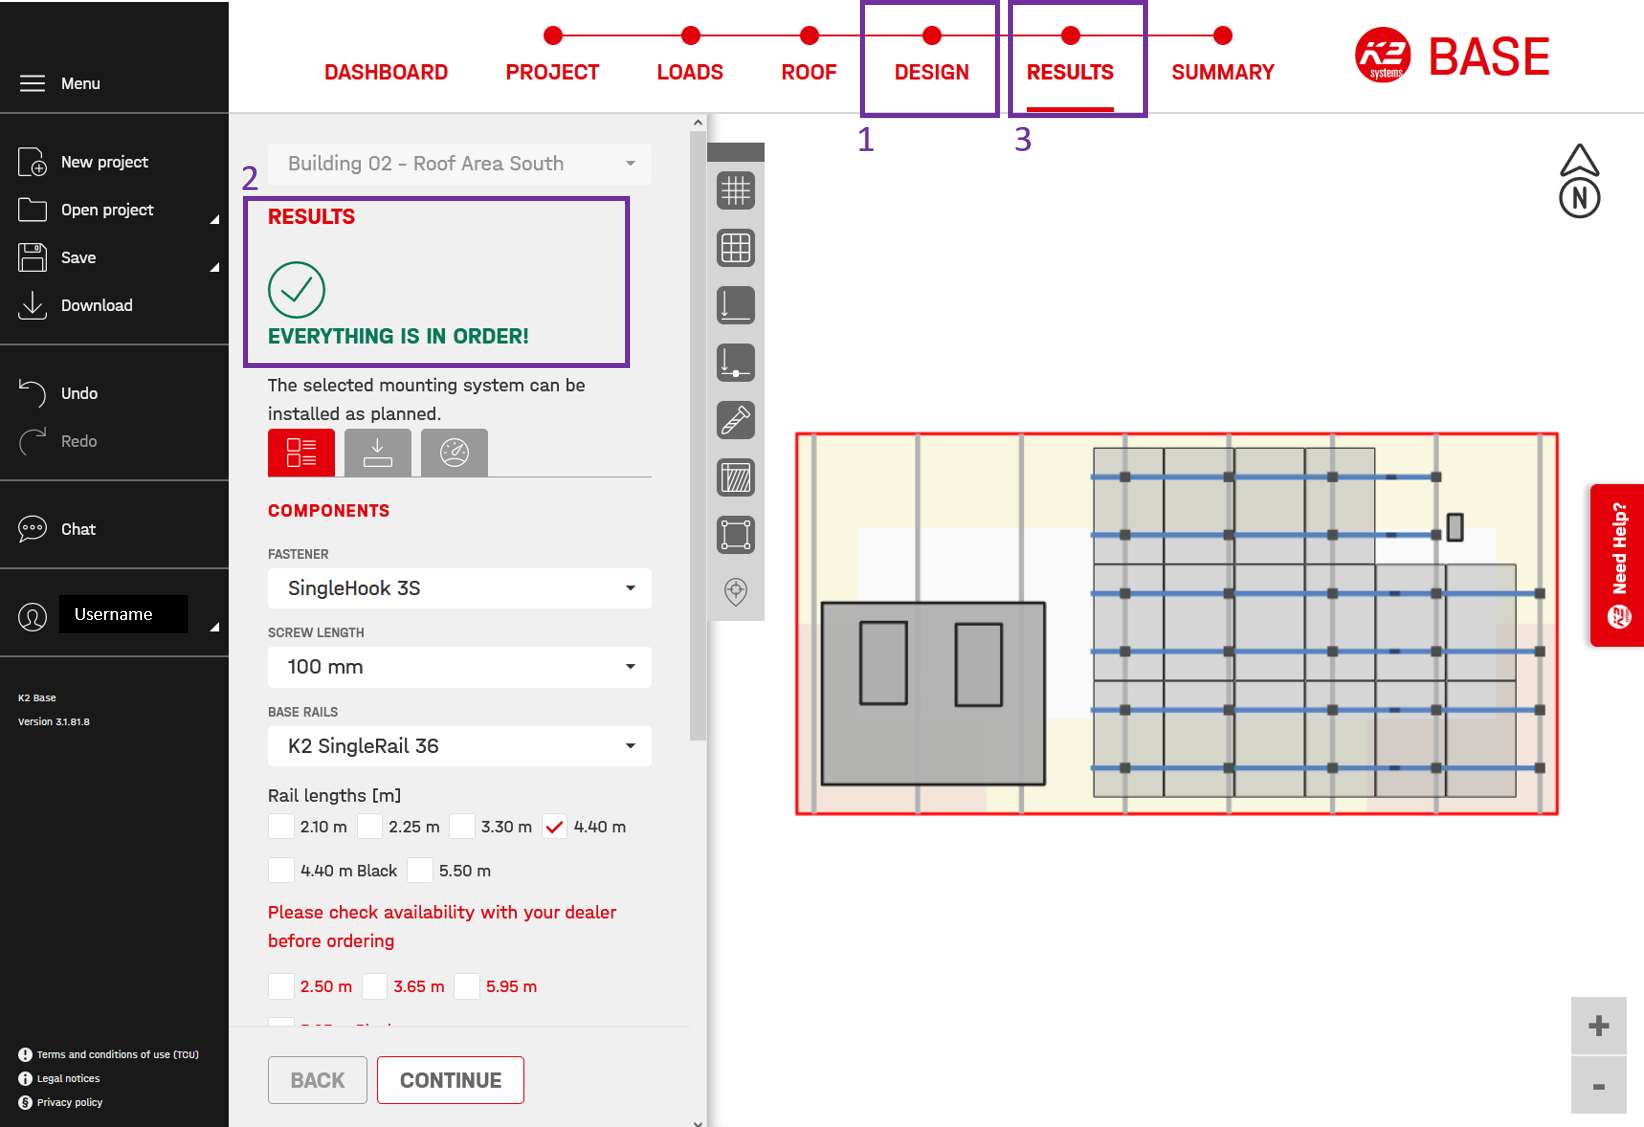
K2 Base - Check results
- Continue by switching from Design to Results at the top of the tab.
If Everything is OK is displayed there in green, switch directly to the Summary tab.
If this is not the case, please follow the correction instructions suggested by K2 Base (if necessary, by re-covering the module area or selecting other mounting system components) and repeat the structural analysis by switching back to the Results tab.
*In the Summary tab, please click on K2+ PVSOL Export in the bottom left corner. Your project is now exported from K2 Base as a zip file and is located in the download directory.
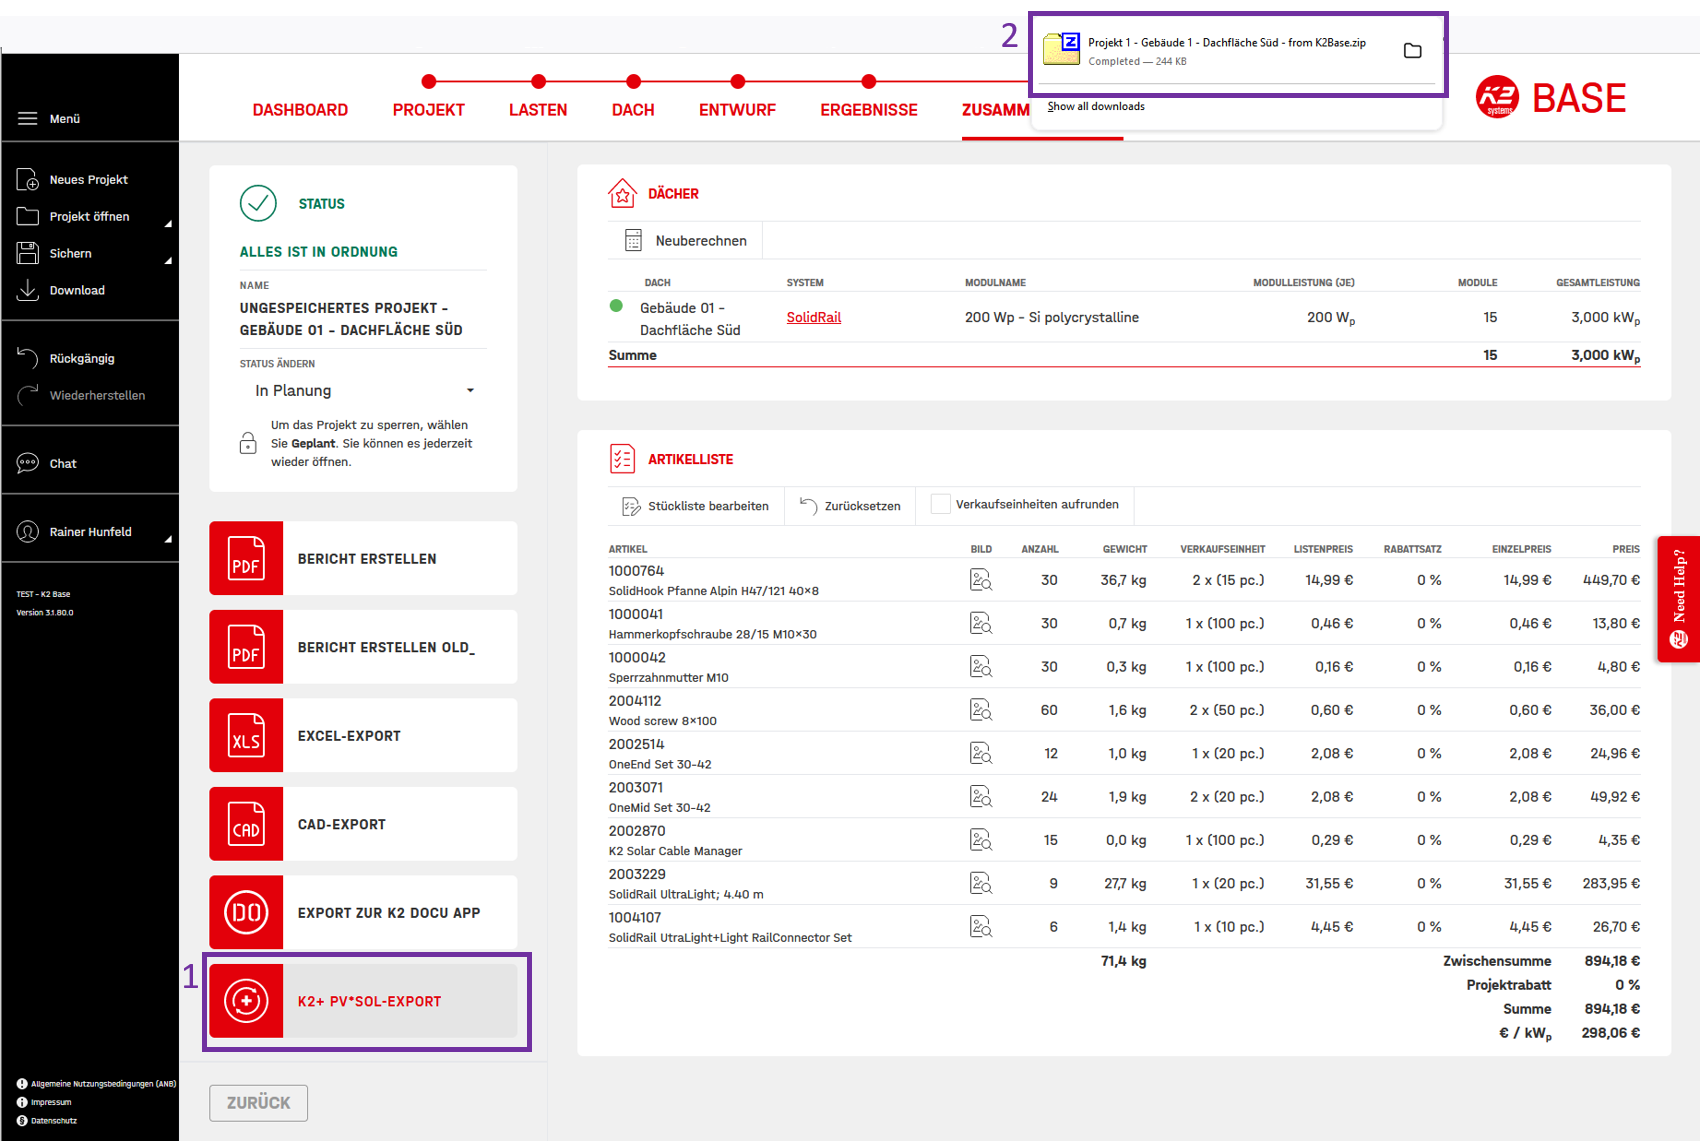
K2 Base - Export project from K2 Base to PV*SOL
Please note the following points when planning in K2 Base:
- The roof area itself or the module area must not be changed in shape and position.
- New barrier objects can be added if this is necessary for the mounting system (service corridors etc.), but when importing into PV*SOL®. these are not transferred.
- The PV module chosen in PV*SOL® can not be changed in K2 Base. The module transmitted by PV*SOL® must be used.
Planning in the Renusol PV Configurator
- Log in to the Renusol PV Configurator or create a new account (Register).

Renusol PV Configurator - Create new project

Renusol PV Configurator - Select PV*SOL import

Renusol PV Configurator - Select json file for import
- Click on New project in the Renusol PV Configurator dashboard
- Then select the PV*SOL® Import
- The path to the json file is in the clipboard and you can paste it directly into the file name field. Alternatively, navigate to the download directory or your chosen storage location, select the file ending in - from PVSOL.json and confirm with Open and then Create project.
- Click the Create button
- If a message appears stating that the import was successful, confirm this with Close. If not, please make sure that you have selected the correct - from PVSOL.json file.

Renusol PV Configurator - Import successful
The Renusol PV Configurator will now ask you for data for the load and structural analysis calculation. Only the essential planning steps that are necessary to obtain a zip file that can then be imported back into PV*SOL® are described below. If you have any questions about the Renusol PV Configurator software, you can find the support provided by Renusol at https://www.pv-configurator.com/pages/support. For further questions about Renusol PV Configurator, please send an e-mail to ts@renusol.com.
- To continue with the planning, first enter a terrain category for the project and click on Next.

Renusol PV Configurator - Select terrain category
- You will be guided through the dialogues with the information on the roofs. After selecting the roof covering and the mounting system, the PV module assignment can be planned.

Renusol PV Configurator - Plan the module coverage
- The statics of the system can then be calculated

Renusol PV Configurator - Calculate structural analysis
- Then under point 3. parts list the button “PV*SOL® Export project as zip” can be selected.

Renusol PV Configurator - export zip file
This zip file can then be imported back into PV*SOL® in the next step.
4. Import the mounting system zip file into PV*SOL®
-
If you are at a different location in PV*SOL®, activate the module area again (right click on the area -> Activate) that you had activated in the previous step during export and go to the tab Module Coverage or Module Mounting

Importing the mounting system zip file into PV*SOL
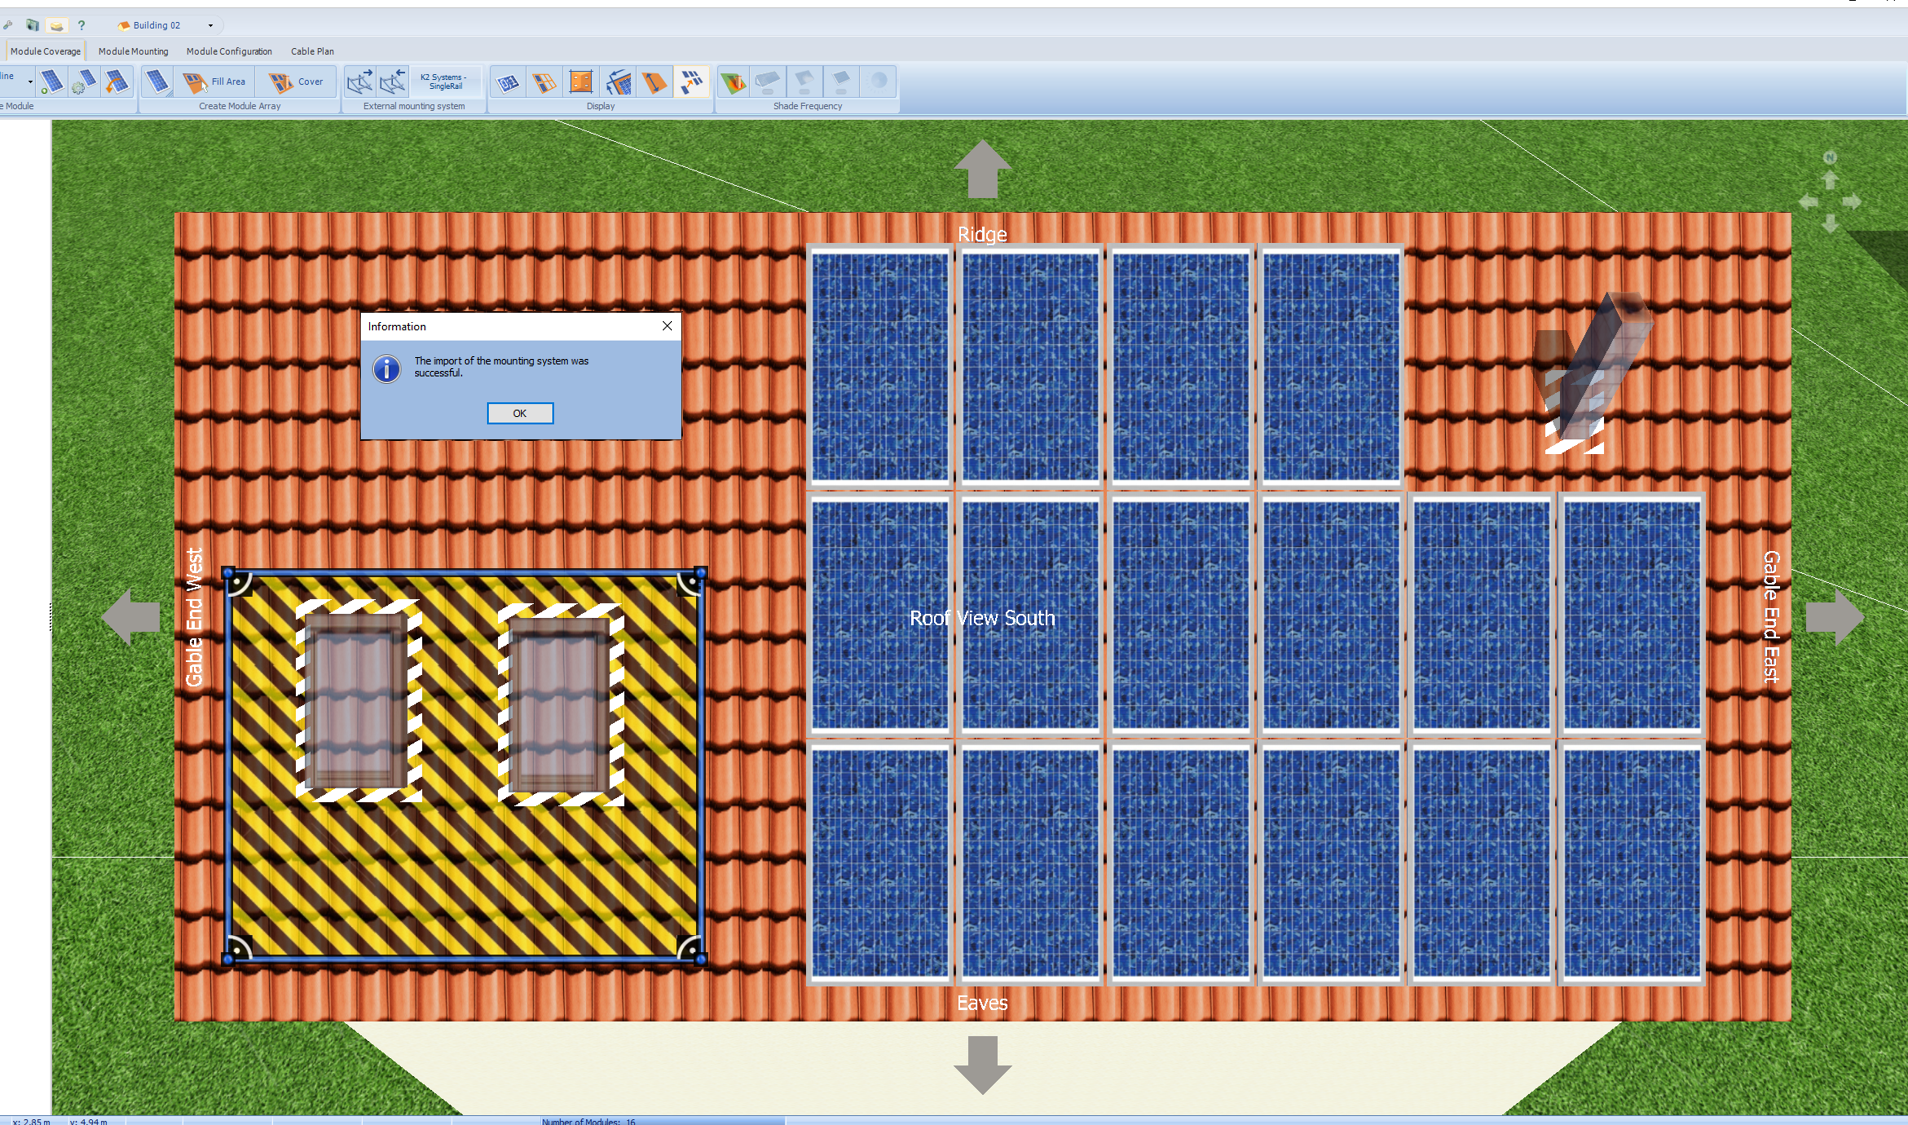
Imported modules are on the roof
-
Now click on the button Mountingsystem Import
 to open the import dialogue.
If you have used your download directory for the export and import and have not made any changes to the file name, PV*SOL® will automatically find the zip file to be imported.
Check that the correct manufacturer is selected in the drop-down list (currently there is only K2 Base).
If this is the case, you can start the import by clicking on Import.
to open the import dialogue.
If you have used your download directory for the export and import and have not made any changes to the file name, PV*SOL® will automatically find the zip file to be imported.
Check that the correct manufacturer is selected in the drop-down list (currently there is only K2 Base).
If this is the case, you can start the import by clicking on Import. -
If you have selected a directory other than the download directory, you have the option to navigate to the location you have selected by clicking on the first folder symbol in the dialogue.
-
If you have changed the name of the import zip file, you can enter the name of the file in the input field or select it by clicking on the folder symbol to the right of the input field.* If the edge distances have been changed in the mounting system software, a message appears during the import process asking whether you want to accept the changed distances.
Please note that after importing, the arrangement of the PV modules should no longer be changed, otherwise the manufacturer’s structural analysis will become invalid. Modifications result in the removal of all elements of the mounting system from the roof. Only one zip file can be imported per module area
5. Parts list and structural analysis

Bill of materials in PV*SOL
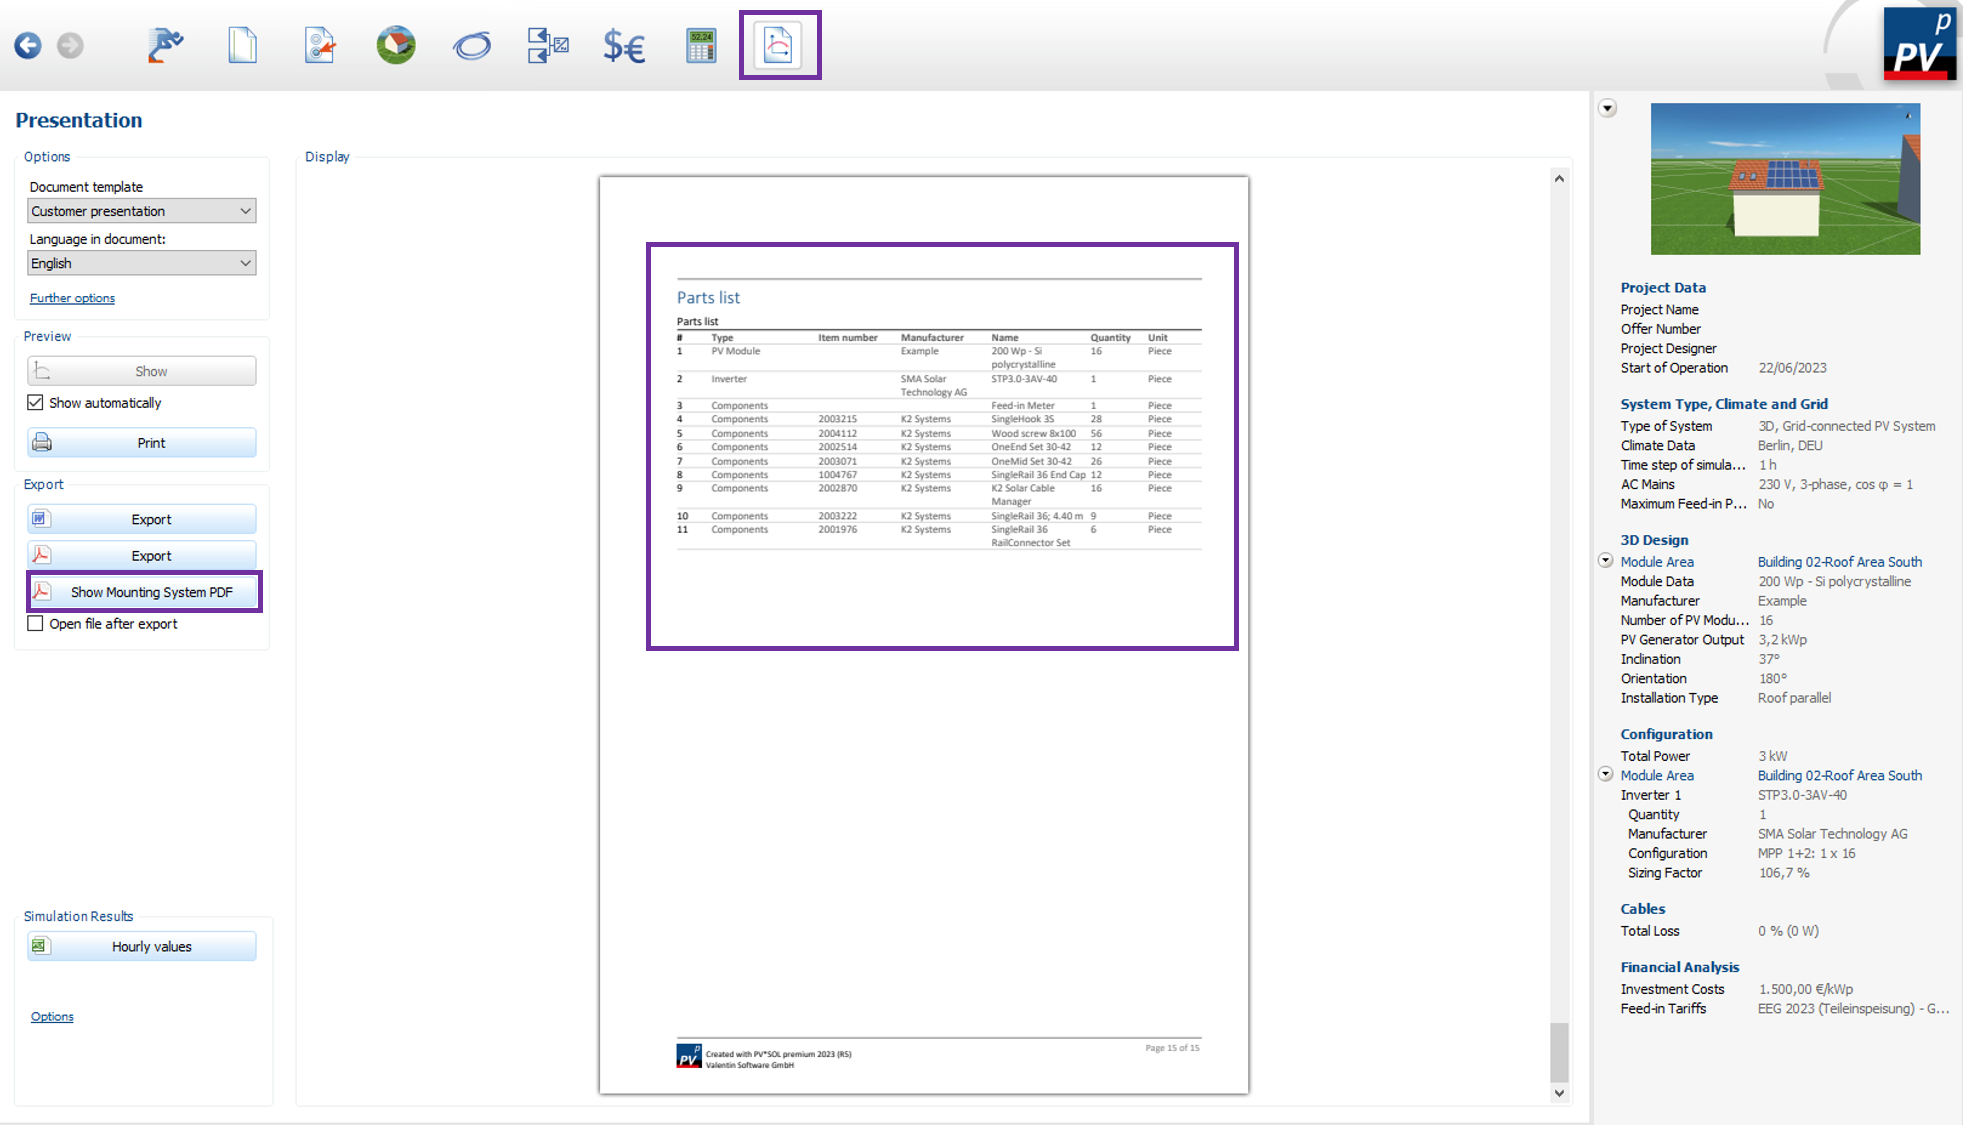
Button to open the structural analysis PDF and parts list at the end of the project report
Example project with K2 Base
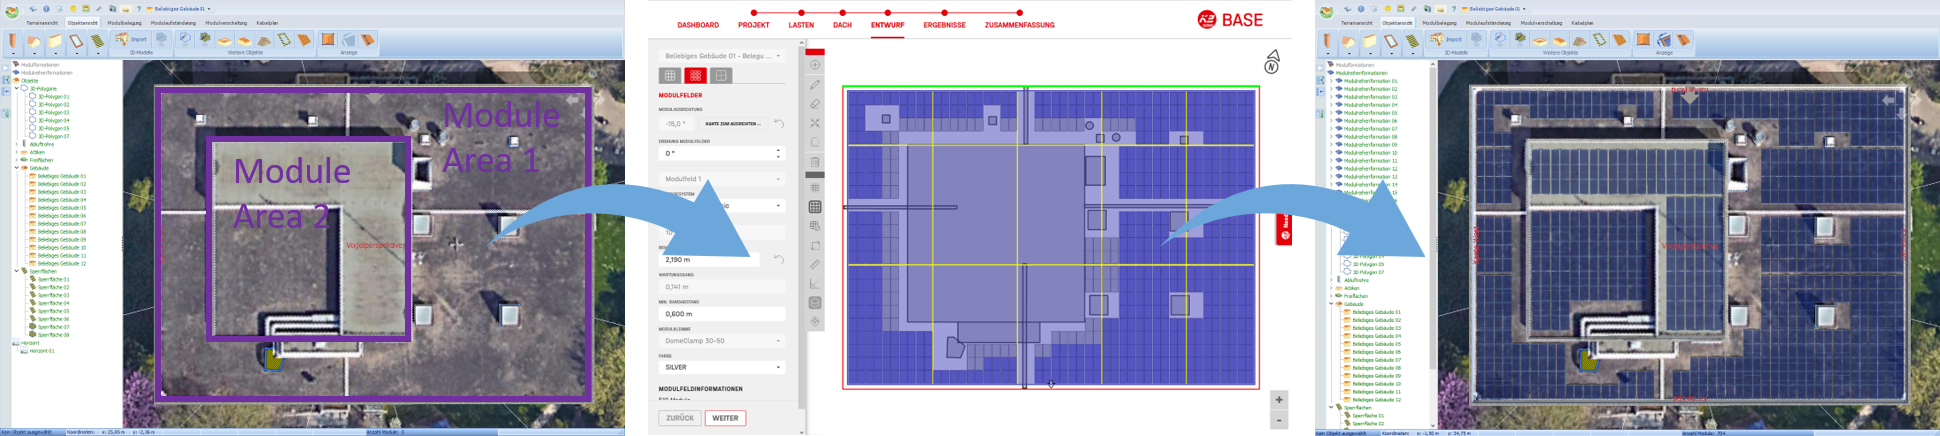
Summary of the example project in pictures
Preconditions
- PV*SOL® premium 2023 R5 or newer.
- prepared module area
- activated account for the planning tool K2 Base
1. Pre-planning PV*SOL®
In this example, an east-west system is planned on two module areas. The example is limited to the steps concerning the mounting system interface.
- Prepare the first module area in PV*SOL® as usual. Select a location, place shading objects, barred areas and edge distances and select a module.
- Activate the first module area (right click on the area -> Activate).
Preparing the module area
- Switch to the Module Mounting tab.
2. Export from PV*SOL® (first module area)
Buttons to open the export and import dialogues
Export dialogue
- Click on the Export to Mounting System Program button
. The export dialogue opens. The name of the module area together with the number of the building - in this example “Building 01 - Mounting Surface South” - serves to identify the import file.
- Click Export and confirm the export message with OK.
3. Planning in K2 Base (first module area)
K2 Base - Create New Import Project
K2 Base - Import dialogue
- Log in to K2 Base and load the first module area (json file ending in from PVSOL.json) into K2 Base via Dashboard -> Open Project from K2+ -> PV*SOL.
- Choose a suitable terrain category, e.g. mixed profile residential area, and click Next.
- In the next dialogue, accept the recognized roof type and the roof covering by clicking the button Create roof.
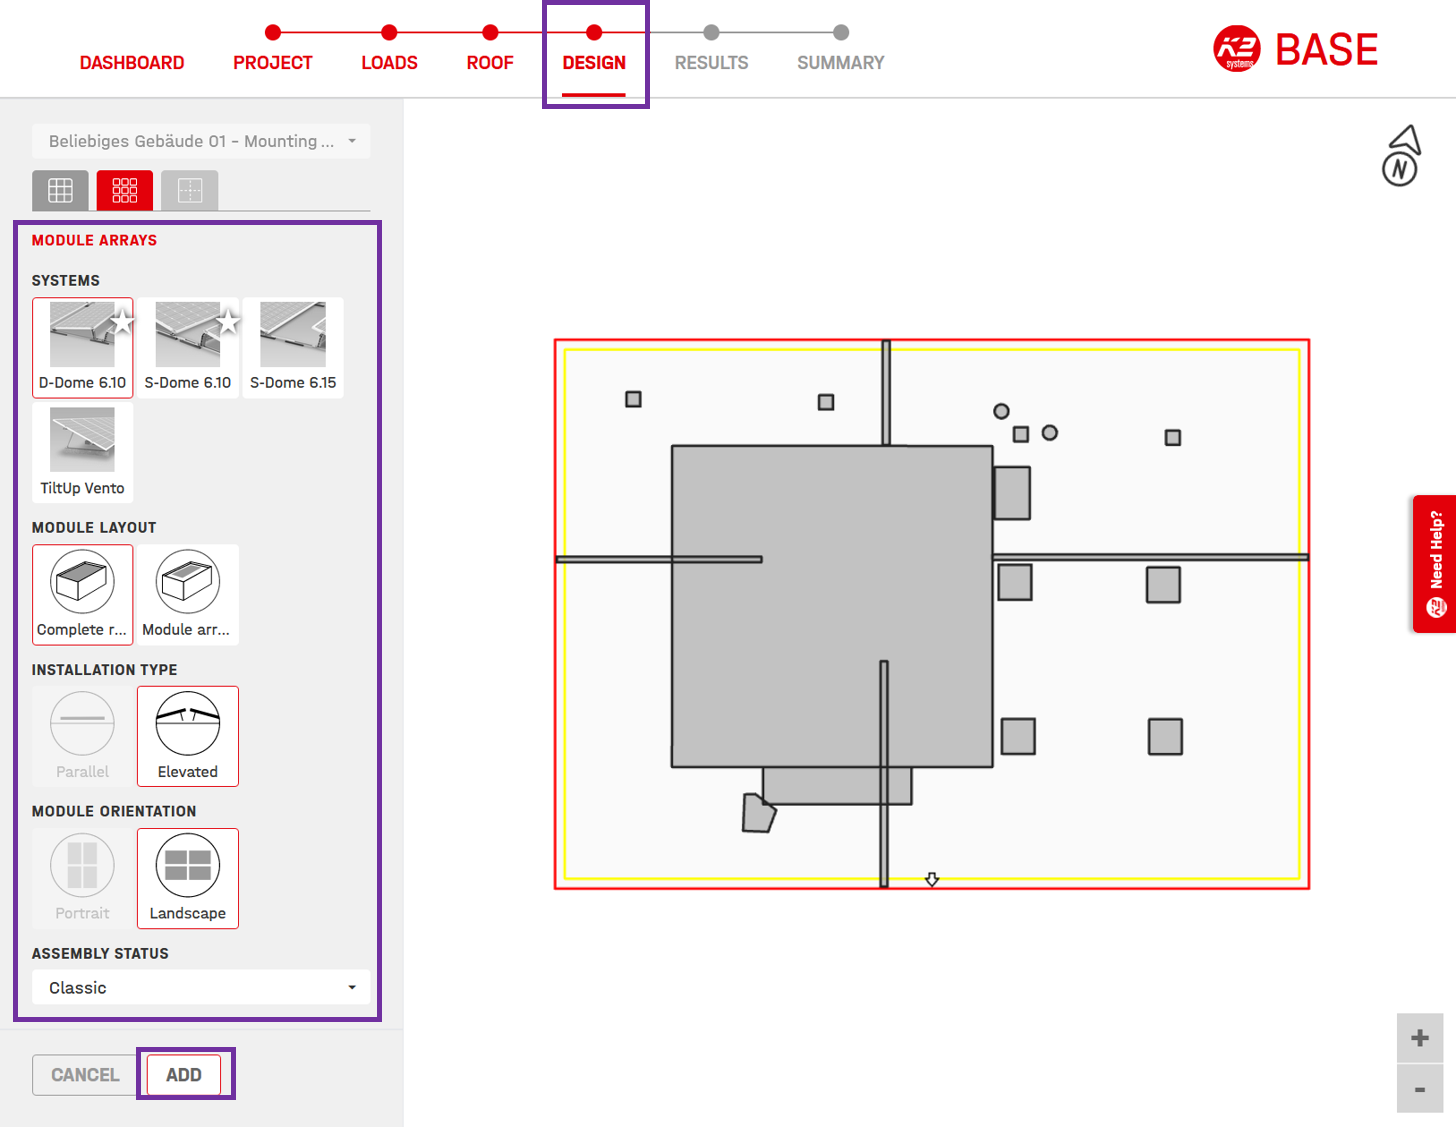
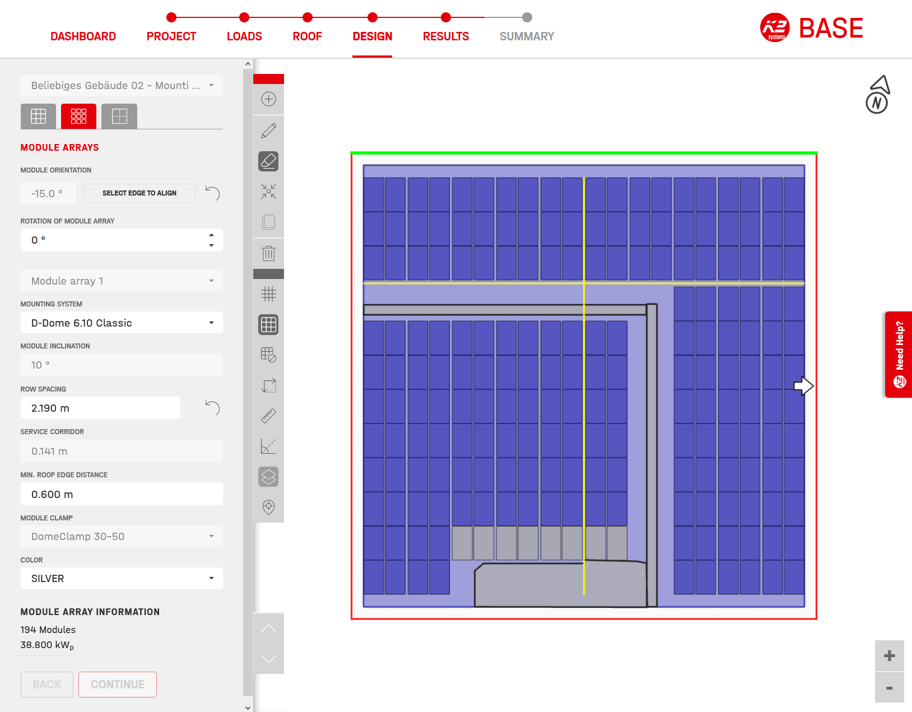
K2 Base - Configure mounting system and cover module area
-
Switch to the Design tab and select, for example, the following configuration:
- D-Dome 6.10
- Complete roof
- elevated
- Landscape
- Classic
-
Click on Add to automatically cover the entire roof. If you want to remove individual modules, you will find a description in the next section under the heading Remove modules (optional).
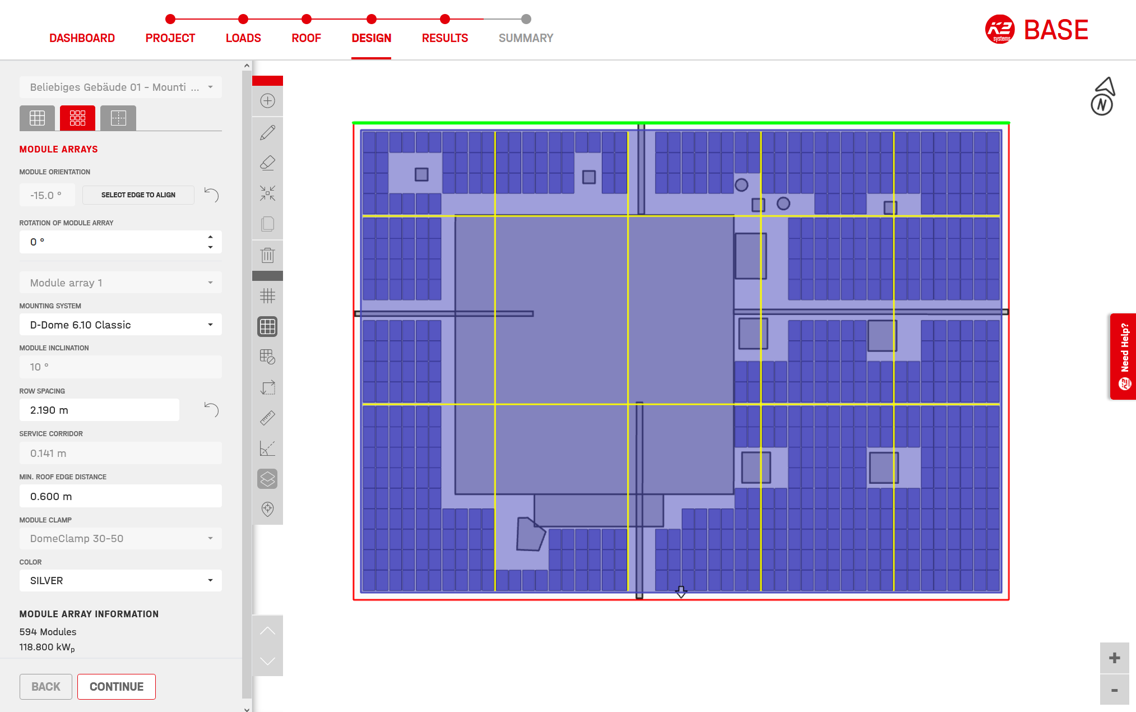
K2 Base - Automatic coverage
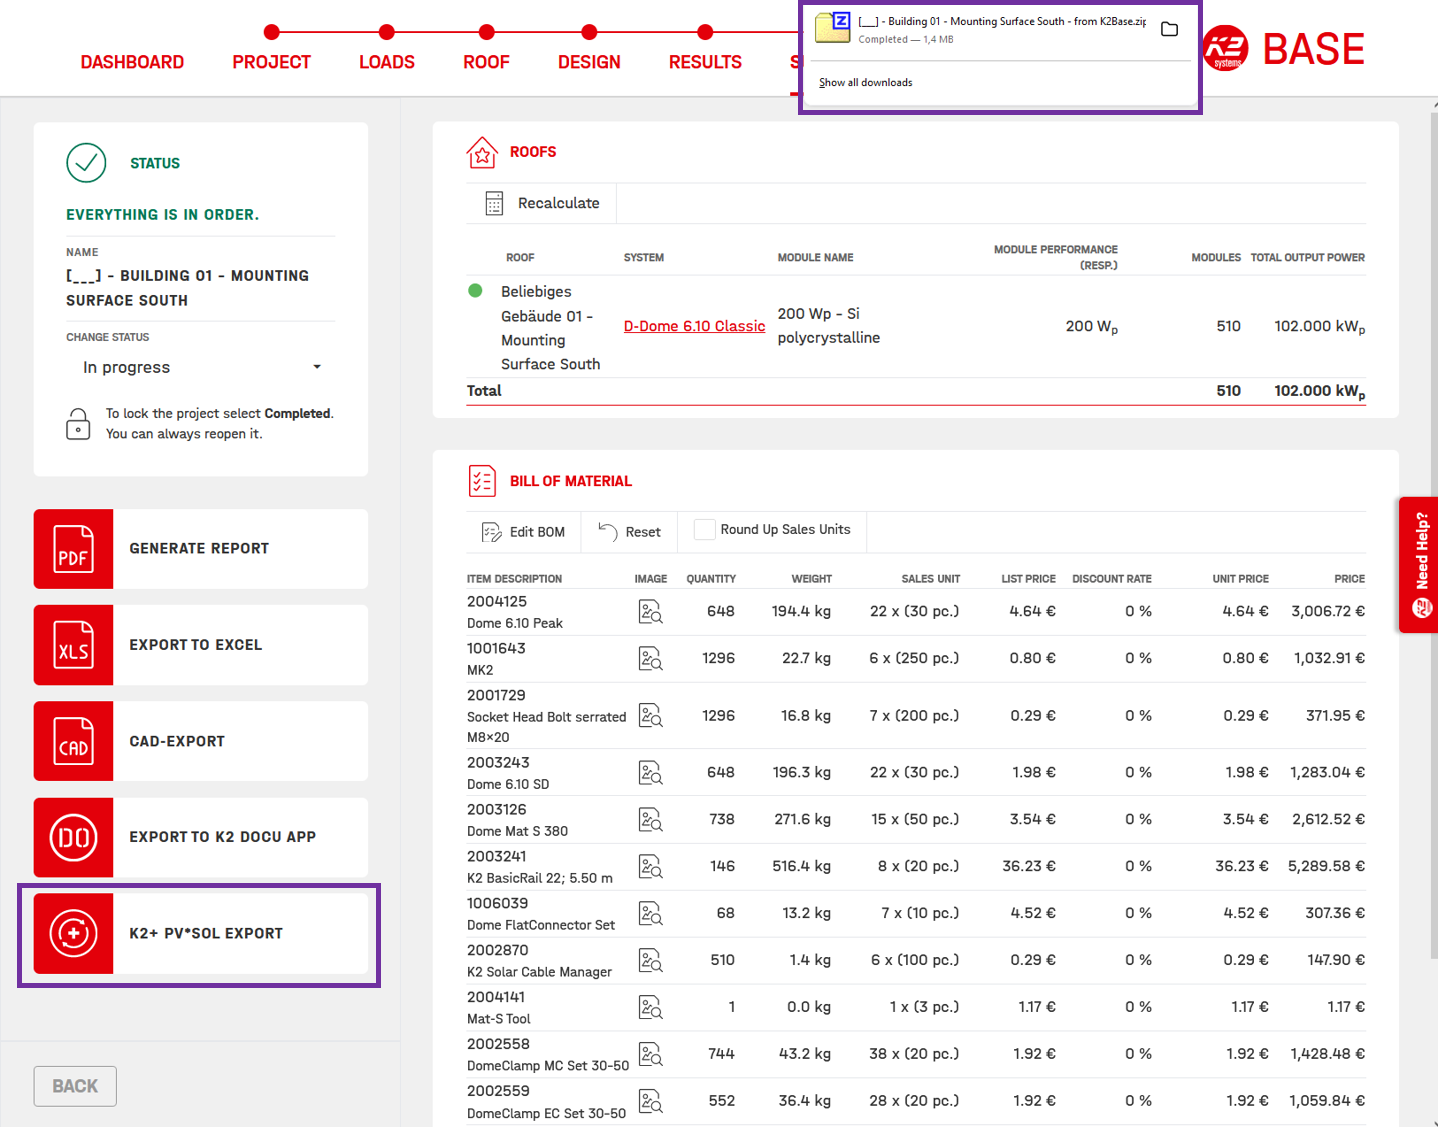
K2 Base - Export project from K2 Base to PV*SOL
-
Switch to the Results tab and then directly to the Summary tab.
-
Download the mounting system zip file by clicking on K2+ PVSOL-Export.
Remove Modules (Optional)
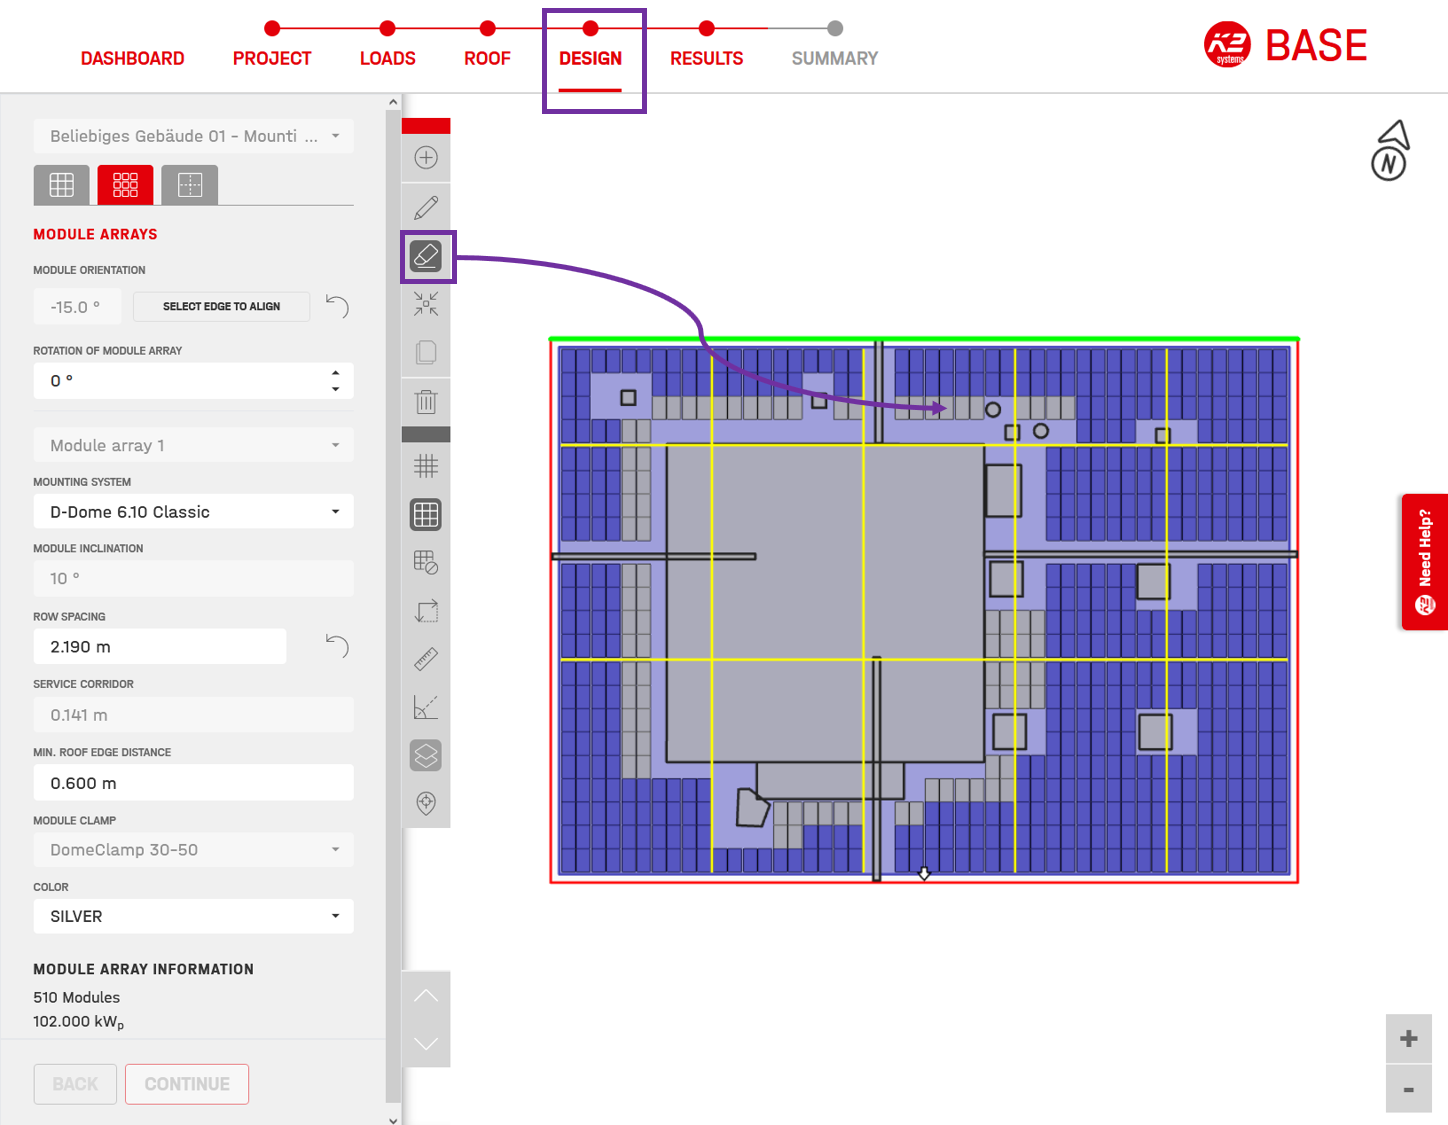
K2 Base - Removing some modules
To remove e.g. heavily shaded modules, you can proceed as follows:
- Select the eraser from the toolbox and remove the shaded modules. After clicking on the eraser, click on the modules to be removed (they turn grey) and click on the eraser again to complete the process.
In this example, the entire auto covered module area was imported into PV*SOL and the shade frequency was determined under Module Configuration -> Start Shade Frequency. Afterwards, K2 Base was opened again, frequently shadowed modules were removed there and the changed K2 Base project were imported into PV*SOL a second time.
4. Import the zip file into PV*SOL® (first module area)
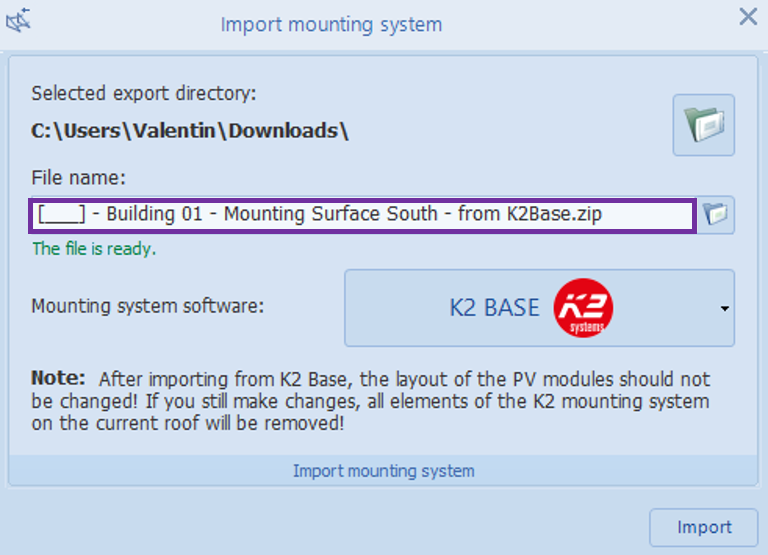
Import of the mounting system zip file into PV*SOL
- Switch back to PV*SOL® and click on Mounting system import
to enter the import dialogue.
- The correct file ([…] - Building 01 - Mounting Surface South - from K2Base.zip) should already be selected there for import. If not, check that both PV*SOL® and your browser have saved the files to the download directory. You can also select the file manually by clicking on the folder icon next to the file name.
- Click Import and in the next dialogue click OK.
5. Export from PV*SOL® (second module area)
- Prepare and activate the second module area (right click on the area -> Activate).
- Click on the button Export to Mounting System Program
. The name Building 02 - Mounting Surface East distinguishes the file from the first module area.
- Click Export and confirm the export message with OK.
6. Planning in K2 Base (second module area)
-
Load the second module area (json file ending in from PVSOL.json) via Dashboard -> Open Project from K2+ -> PV*SOL into K2 Base.
-
Select the terrain category you chose for the first module area and click Next.
-
Accept the detected roof type and the roof covering with the button Create roof.
K2 Base - Coverage of the second module area (the grey modules have been removed)
-
Switch to the Design tab and select the same configuration as for the first module area. for example:
- D-Dome 6.10
- Complete roof
- elevated
- Landscape
- Classic
-
Click on Add to automatically cover the entire roof.
-
Switch to the Results tab and then directly to the Summary tab.
-
Download the mounting system zip file by clicking on K2+ PVSOL-Export.
7. Importing the zip file into PV*SOL®(second module area)
- Switch back to PV*SOL® and click on Import mounting system
to enter the import dialogue. The correct file ([…] - Building 02 - Mounting Surface East - from K2Base.zip) should already be selected there for import.
- Click Import and in the next dialogue click OK.
8. Done
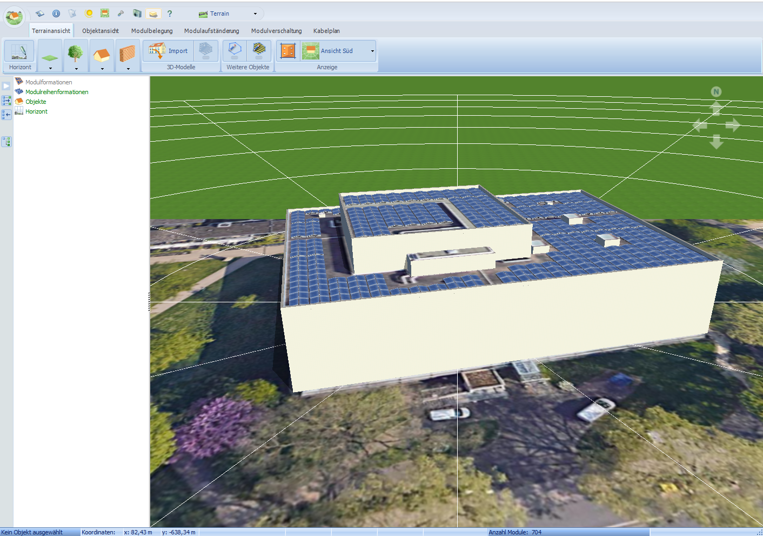
View of the covered building
The plant should now be correctly placed on the roof. It can be configured as usual and then simulated.
In order not to invalidate the structural analysis created by K2 Base, the arrangement of the PV modules must not be changed after the import to PV*SOL®.
After closing the 3D environment, you will find the parts list of the installation on the Plans and parts list page. On the Presentation page you will find the button Show mounting system PDF, which opens a PDF file containing the Structural analysis report generated by the mounting system manufacturer in a PDF application.